基于OpenVINO™ 2022.1 C++ API部署YOLOv7预训练模型
 openlab_4276841a
更新于 3年前
openlab_4276841a
更新于 3年前
作者:杨亦诚
任务背景
作为视觉应用中最常见的任务之一,目标检测一直是各类新模型刷榜的必争之地,其中就以YOLO系列的网络结构最为突出。YOLO的全称是you only look once,指只通过one-stage的方式需要“浏览一次”就可以识别出图中的物体的类别和位置。近期YOLO官方团队又放出新版本——YOLOv7,速度、精度都超越其他变体。本文将分享如何基于OpenVINO™ 2022.1工具套件部署YOLOv7官方提供的预训练模型。附C++/Python源码及使用方法。
代码仓库:https://github.com/OpenVINO-dev-contest/YOLOv7_OpenVINO_cpp-python
OpenVINO简介
用于高性能深度学习的英特尔发行版OpenVINO™工具套件基于oneAPI而开发,以期在从边缘到云的各种英特尔平台上,帮助用户更快地将更准确的真实世界结果部署到生产系统中。通过简化的开发工作流程,OpenVINO™可赋能开发者在现实世界中部署高性能应用程序和算法。
在推理后端,得益于 OpenVINO™ 工具套件提供的“一次编写,随处部署”特性,转换后的模型能够在不同的英特尔硬件平台上运行,无需重新构建,有效简化了构建与迁移过程。此外,为了支持更多的异构加速单元,OpenVINO™的runtime api底层采用了插件式的开发架构,基于oneAPI中的MKL-DNN、oneDNN等函数计算加速库,针对AVX-512等通用指令集进行优化,为不同的硬件执行单元分别实现了一套完整的高性能算子库,提升模型在推理运行时的整体性能表现。
YOLOv7简介
官方版的YOLOv7相同体量下比YOLOv5精度更高,速度快120%(FPS),比 YOLOX 快180%(FPS),比 Dual-Swin-T 快1200%(FPS),比 ConvNext 快550%(FPS),比 SWIN-L快500%(FPS)。在5FPS到160FPS的范围内,无论是速度或是精度,YOLOv7都超过了目前已知的检测器,并且在GPU V100上进行测试, 精度为56.8% AP的模型可达到30 FPS(batch=1)以上的检测速率,与此同时,这是目前唯一一款在如此高精度下仍能超过30FPS的检测器。
任务开发流程
我们先整体来看下 YOLOv7的输入输出结构,首先对输入的图片 resize 为 640x640 大小,输入到 backbone 网络中,然后经 head 层网络输出三层不同 size 大小的 feature map,并输出预测结果,这里以 coco 为例子,输出为 80 个类别,然后每个输出(x ,y, w, h, o) 即坐标位置和是否存在物体的置信度,3 是指的 anchor 数量,因此每一层的输出为 (80+5) x 3 = 255再乘上 feature map 的大小就是最终的输出了。整个开发流程可以分为数据处理模块定义、前处理任务、推理任务、后处理任务四部分组成。
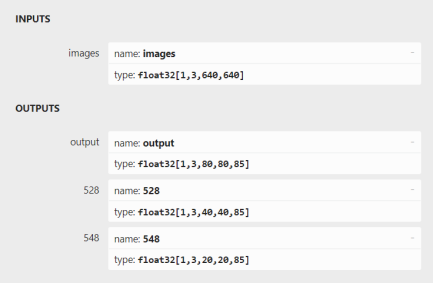
图:YOLOv7官方预训练模型的输入输出结构
1. 数据处理模块
定义Object结构体用来存放模型的输出数据,包含bounding box信息,类别标签,以及是否存在物体和类别的累计置信度。
定义class_names向量,用于存放coco数据集的所有标签。
struct Object

{

    cv::Rect_<float> rect;

    int label;

    float prob;

};

const std::vector<std::string> class_names = {

    "person", "bicycle", "car", "motorcycle", "airplane", "bus", "train", "truck", "boat", "traffic light",

    "fire hydrant", "stop sign", "parking meter", "bench", "bird", "cat", "dog", "horse", "sheep", "cow",

    "elephant", "bear", "zebra", "giraffe", "backpack", "umbrella", "handbag", "tie", "suitcase", "fri**ee",

    "skis", "snowboard", "sport***all", "kite", "baseball bat", "baseball glove", "skateboard", "surfboard",

    "tennis racket", "bottle", "wine glass", "cup", "fork", "knife", "spoon", "bowl", "banana", "apple",

    "sandwich", "orange", "broccoli", "carrot", "hot dog", "pizza", "donut", "cake", "chair", "couch",

    "potted plant", "bed", "dining table", "toilet", "tv", "laptop", "mouse", "remote", "keyboard", "cell phone",

    "microwave", "oven", "toaster", "sink", "refrigerator", "book", "clock", "vase", "scissors", "teddy bear",

    "hair drier", "toothbrush"};
定义letterbox与scale_box模块,分别用于在图像前处理任务中为输入数据添加letterbox,以及在后处理任务还原letterbox带来坐标位置变换。这里特别值得注意的是我们增加了一个padd向量,用于存放在添加letterbox过程中letterbox的size信息以及相较原始图片的缩放比例信息,该组数据会用于在后处理任务中还原删除letterbox以后的结果。
cv::Mat letterbox(cv::Mat &src, int h, int w, std::vector<float> &padd)

{

    // Resize and pad image while meeting stride-multiple constraints

    int in_w = src.cols;

    int in_h = src.rows;

    int tar_w = w;

    int tar_h = h;

    float r = min(float(tar_h) / in_h, float(tar_w) / in_w);

    int inside_w = round(in_w * r);

    int inside_h = round(in_h * r);

    int padd_w = tar_w - inside_w;

    int padd_h = tar_h - inside_h;

    cv::Mat resize_img;

    // resize

    resize(src, resize_img, cv::Size(inside_w, inside_h));

    // divide padding into 2 sides

    padd_w = padd_w / 2;

    padd_h = padd_h / 2;

    padd.push_back(padd_w);

    padd.push_back(padd_h);

    // store the ratio

    padd.push_back(r);

    int top = int(round(padd_h - 0.1));

    int bottom = int(round(padd_h + 0.1));

    int left = int(round(padd_w - 0.1));

    int right = int(round(padd_w + 0.1));

    // add border

    copyMakeBorder(resize_img, resize_img, top, bottom, left, right, 0, cv::Scalar(114, 114, 114));

    return resize_img;

}

cv::Rect scale_box(cv::Rect box, std::vector<float> &padd)

{

    // remove the padding area

    cv::Rect scaled_box;

    scaled_box.x = box.x - padd[0];

    scaled_box.y = box.y - padd[1];

    scaled_box.width = box.width;

    scaled_box.height = box.height;

    return scaled_box;

}
定义generate_proposals模块,该模块具体有以下几个功能:
1. 根据预定义的anchors,在输入图像中生成各类feature map的先验框;
2. 根据输出结果调整先验框位置和大小,并将其作为bounding box还原到输入图像的坐标系中;
3. 过滤置信度较低的分类结果,获取类别结果;
static void generate_proposals(int stride, const float *feat, float prob_threshold, std::vector<Object> &objects)

{

    // get the results from proposals

    float anchors[18] = {12, 16, 19, 36, 40, 28, 36, 75, 76, 55, 72, 146, 142, 110, 192, 243, 459, 401};

    int anchor_num = 3;

    int feat_w = 640 / stride;

    int feat_h = 640 / stride;

    int cls_num = 80;

    int anchor_group = 0;

    if (stride == 8)

        anchor_group = 0;

    if (stride == 16)

        anchor_group = 1;

    if (stride == 32)

        anchor_group = 2;

    // 3 x h x w x (80 + 5)

    for (int anchor = 0; anchor <= anchor_num - 1; anchor++)

    {

        for (int i = 0; i <= feat_h - 1; i++)

        {

            for (int j = 0; j <= feat_w - 1; j++)

            {

                float box_prob = feat[anchor * feat_h * feat_w * (cls_num + 5) + i * feat_w * (cls_num + 5) + j * (cls_num + 5) + 4];

                box_prob = sigmoid(box_prob);

                // filter the bounding box with low confidence

                if (box_prob < prob_threshold)

                    continue;

                float x = feat[anchor * feat_h * feat_w * (cls_num + 5) + i * feat_w * (cls_num + 5) + j * (cls_num + 5) + 0];

                float y = feat[anchor * feat_h * feat_w * (cls_num + 5) + i * feat_w * (cls_num + 5) + j * (cls_num + 5) + 1];

                float w = feat[anchor * feat_h * feat_w * (cls_num + 5) + i * feat_w * (cls_num + 5) + j * (cls_num + 5) + 2];

                float h = feat[anchor * feat_h * feat_w * (cls_num + 5) + i * feat_w * (cls_num + 5) + j * (cls_num + 5) + 3];

                double max_prob = 0;

                int idx = 0;

                // get the class id with maximum confidence

                for (int t = 5; t < 85; ++t)

                {

                    double tp = feat[anchor * feat_h * feat_w * (cls_num + 5) + i * feat_w * (cls_num + 5) + j * (cls_num + 5) + t];

                    tp = sigmoid(tp);

                    if (tp > max_prob)

                    {

                        max_prob = tp;

                        idx = t;

                    }

                }

                // filter the class with low confidence

                float cof = box_prob * max_prob;

                if (cof < prob_threshold)

                    continue;


                // convert results to xywh

                x = (sigmoid(x) * 2 - 0.5 + j) * stride;

                y = (sigmoid(y) * 2 - 0.5 + i) * stride;

                w = pow(sigmoid(w) * 2, 2) * anchors[anchor_group * 6 + anchor * 2];

                h = pow(sigmoid(h) * 2, 2) * anchors[anchor_group * 6 + anchor * 2 + 1];

                float r_x = x - w / 2;

                float r_y = y - h / 2;

                // store the results

                Object obj;

                obj.rect.x = r_x;

                obj.rect.y = r_y;

                obj.rect.width = w;

                obj.rect.height = h;

                obj.label = idx - 5;

                obj.prob = cof;

                objects.push_back(obj);

            }

        }

    }

}
2. 前处理任务
前处理主要包含以下几个步骤
1. 使用OpenCV读取图片文件;
2. 对于原始图片进行resize并添加letterbox;
3. 将色彩通道从BGR转化为RGB;
4. 将输入数据进行layout转置(NHWC=>NCHW),与归一化操作 (见模型推理部分代码);
    cv::Mat src_img = cv::imread(image_path);

    cv::Mat img;

    std::vector<float> padd;

    cv::Mat boxed = letterbox(src_img, img_h, img_w, padd);

    cv::cvtColor(boxed, img, cv::COLOR_BGR2RGB);
3. 推理任务
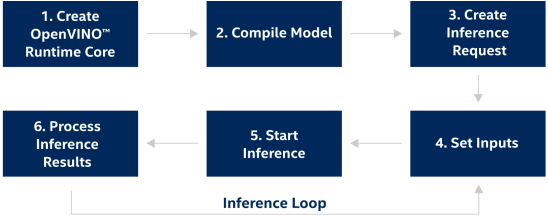
图:OpenVINOTM工具套件runtime开发流程
模型推理部分主要调用OpenVINO™ 的C++ API进行实现,OpenVINO™ 推理接口的调用流程如上图所示(可参考官方说明:https://docs.openvino.ai/latest/openvino_docs_OV_UG_Integrate_OV_with_your_application.html),在这里第2步 Complie Model亦可分为模型读取与模型编译两个步骤执行,同时可以发现相较2021.4之前的版本,OpenVINO™ 2022.1在输入以及输出数据的接口调用方式上有了极大的简化,可以通过Tensor相关的构造函数,轻松实现模型数据的载入和读取。在整个过程中开发者需要将输入数据进行layout转置(NHWC=>NCHW),并填充到input tensor所对应的数据指针地址中。在结果数据提取部分,由于该模型有3个不同尺度feature map output,因此我们需要逐一获取他们结果数据指针。
 // -------- Step 1. Initialize OpenVINO Runtime Core --------

    ov::Core core;

    // -------- Step 2. Read a model --------

    std::shared_ptr<ov::Model> model = core.read_model(model_path);

    // -------- Step 3. Loading a model to the device --------

    ov::CompiledModel compiled_model = core.compile_model(model, device_name);

    // Get input port for model with one input

    auto input_port = compiled_model.input();

    // Create tensor from external memory

    // ov::Tensor input_tensor(input_port.get_element_type(), input_port.get_shape(), input_data.data());

    // -------- Step 4. Create an infer request --------

    ov::InferRequest infer_request = compiled_model.create_infer_request();

    // -------- Step 5. Prepare input --------

    ov::Tensor input_tensor1 = infer_request.get_input_tensor(0);

    // NHWC => NCHW

    auto data1 = input_tensor1.data<float>();

    for (int h = 0; h < img_h; h++)

    {

        for (int w = 0; w < img_w; w++)

        {

            for (int c = 0; c < 3; c++)

            {

                // int in_index = h * img_w * 3 + w * 3 + c;

                int out_index = c * img_h * img_w + h * img_w + w;

                data1[out_index] = float(img.at<cv::Vec3b>(h, w)[c]) / 255.0f;

            }

        }

    }

    // -------- Step 6. Start inference --------

    infer_request.infer();

    // -------- Step 7. Process output --------

    auto output_tensor_p8 = infer_request.get_output_tensor(0);

    const float *result_p8 = output_tensor_p8.data<const float>();

    auto output_tensor_p16 = infer_request.get_output_tensor(1);

    const float *result_p16 = output_tensor_p16.data<const float>();

    auto output_tensor_p32 = infer_request.get_output_tensor(2);

    const float *result_p32 = output_tensor_p32.data<const float>();
4. 后处理任务
后处理部分需要调用我们之前定义的generate_proposals用于还原每一个feature map的结果数据,并进行堆叠,最后使用OpenCV DNN模块中自带的NMS方法,完成对结果bounding box的非极大抑制过滤,获取我们在原始input image中的目标位置与类别信息。
 generate_proposals(8, result_p8, prob_threshold, objects8);

    proposals.insert(proposals.end(), objects8.begin(), objects8.end());

    generate_proposals(16, result_p16, prob_threshold, objects16);

    proposals.insert(proposals.end(), objects16.begin(), objects16.end());

    generate_proposals(32, result_p32, prob_threshold, objects32);

    proposals.insert(proposals.end(), objects32.begin(), objects32.end());

    std::vector<int> classIds;

    std::vector<float> confidences;

    std::vector<cv::Rect> boxes;

    for (size_t i = 0; i < proposals.size(); i++)

    {

        classIds.push_back(proposals[i].label);

        confidences.push_back(proposals[i].prob);

        boxes.push_back(proposals[i].rect);

    }

    std::vector<int> picked;

    // do non maximum suppression for each bounding boxx

    cv::dnn::NMSBoxe***oxes, confidences, prob_threshold, nms_threshold, picked);
此外,我们还需要进一步调整模型input data对应的结果数据,将其还原到原始尺寸的图片上进行展示。
 int idx = picked[i];

        cv::Rect box = boxes[idx];

        cv::Rect scaled_box = scale_box(box, padd);

        drawPred(classIds[idx], confidences[idx], scaled_box, padd[2], raw_h, raw_w, src_img, class_names);
参考示例使用方法
该示例分别提供了C++和Python的参考实现,具体使用方法如下:
# 下载示例仓库
$ git clone https://github.com/OpenVINO-dev-contest/YOLOv7_OpenVINO_cpp-python.git
1. 依赖安****>
· C++ 环境依赖
由于本示例的C++版本只依赖OpenVINO™ 和OpenCV的运行库,所以需要开发者提前完成对这两个工具组件的安装:
OpenVINO™ C++ runtime | https://docs.openvino.ai/latest/openvino_docs_install_guides_installing_openvino_linux.html#install-openvino |
OpenCV环境 | https://docs.opencv.org/4.x/d7/d9f/tutorial_linux_install.html |
注:由于该示例中提供的CMakeList使用OpenCV的默认路径,因此需要在完成OpenCV的编译后,执行make install命令。
· Python环境依赖
$ pip install -r python/requirements Python环境的安装相对简单,只需通过pip命令行工具进行依赖安装
2. 预训练模型下载
可以从官方github仓库提供的链接中下载基于COCO数据集的YOLOv7预训练模型权重
https://github.com/WongKinYiu/yolov7
Model | Test Size | APtest | AP50test | AP75test |
640 | 51.4% | 69.7% | 55.9% | |
640 | 53.1% | 71.2% | 57.8% | |
1280 | 54.9% | 72.6% | 60.1% | |
1280 | 56.0% | 73.5% | 61.2% | |
1280 | 56.6% | 74.0% | 61.8% | |
1280 | 56.8% | 74.4% | 62.1% |
3. 模型转换
目前 OpenVINO™ runtime可以直接支持onnx格式的模型部署,所以我们在得到.pt权重文件后,只需使用官方自带export.py脚本,就可将其导出为onnx格式模型,具体过程如下:
# 下载YOLOv7官方仓库:
$ git clone git@github.com:WongKinYiu/yolov7.git
$ cd yolov7/models
$ python export.py --weights yolov7.pt
4. 测试运行
· C++示例
  $ cd cpp
  $ mkdir build && cd build
  $ source '~/intel/openvino_2022.1.0.643/bin/setupvars.sh'
  $ cmake ..
  $ make
编译C++示例源码,编译完成后会在build目录下生成yolov7可执行文件:
$ yolov7 yolov7.onnx data/horses.jpg 'CPU' 执行推理任务:
· Python示例
执行推理任务:
$ python python/main.py -m yolov7.onnx -i data/horse.jpg 5. 测试结果
运行推理示例后,会在本地目录下生成代bounding box以及label的图片,这里我们用到官方仓库中附带的马匹数据进行测试,具体结果如下:
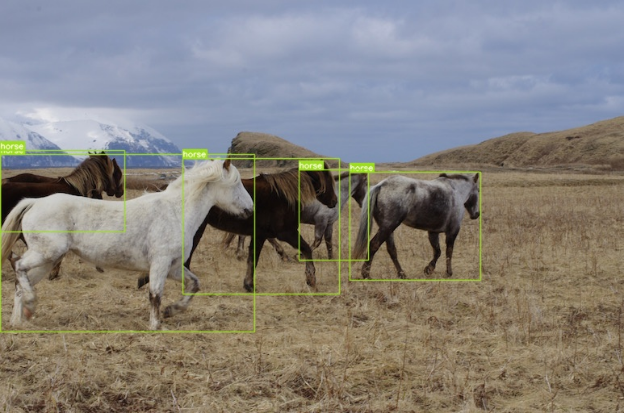
图:推理运行结果
Benchmark App 介绍
OpenVINO™ 提供了性能测试工具 Benchmark App ,方便开发者快速测试 OpenVINO™ 模型在不同的硬件平台上的性能。我们以下面的例子,简单介绍 benchmark app 的使用方法和相关参数,
$ benchmark_app -m yolov7.onnx -hint throughput 更多内容请参考 Benchmark App 官方文档。
-m: 指定模型路径。由于目前OpenVINO™ runtime是支持直接读取onnx格式文件的,所以这里我们设置为导出以后onnx模型。
-hint: 指定性能测试的优先策略,以自动选择底层性能优化相关参数。这里我们选择 throughput 模式来提升系统整体吞吐量。如果应用对延迟比较敏感,推荐使用 latency 模式来减少推理延迟。
结论
YOLOv7由于其出色的精度和性能表现,在推出第一时就受到了极大的关注,目前github上的star已超过5K。本示例通过OpenVINO™ 2022.1新版本的C++ API接口,实现对YOLOv7官方预训练模型的部署。最后使用OpenVINO™ 自带的benchmark_app工具进一步对模型的性能进行验证测试。
参考文献
YOLOv7官方仓库:
https://github.com/WongKinYiu/yolov7
OpenVINO™ 开发文档:
https://docs.openvino.ai/latest/openvino_docs_OV_UG_Integrate_OV_with_your_application.html