在英特尔锐炫™独立显卡运行类ChatGPT的开源大语言模型(LLM) Dolly 2.0
 openlab_4276841a
更新于 3年前
openlab_4276841a
更新于 3年前
作者:李翊玮 & Aidova, Ekaterina
前言:
以下为当前一代大型语言模型(LLM)的基石说明。人类偏好强化学习Reinforcement learning with human preferences(RLHF)和InstructGPT等技术一直是ChatGPT和GPT-4等突破的核心基础。然而,这些强大的模型仍然隐藏在API后面,我们对它们的底层架构知之甚少。指令遵循模型能够生成文本以响应提示(Prompt),通常用于协助编写创作、聊天机器人和内容生成等任务。许多用户现在定期与这些模型交互,甚至将它们用于工作,但大多数此类模型仍然是闭源的,需要大量的计算资源进行实验。
Dolly 2.0是第一个开源的,遵循指令的LLM,由Databricks在一个透明且免费提供的数据集上进行微调,该数据集也是开源的,可用于商业目的。这意味着 Dolly 2.0 可用于商业应用程序,而无需支付 API 访问费用或与第三方共享数据。尽管比ChatGPT要小得多Dolly 2.0也可表现出类似的特征。
接下来让我们用来自原基科技带有英特尔锐炫™独立显卡的B18盒子配上OpenVINO notebooks开源代码示例在本地端体验大语言模型的魅力吧!

安装OpenVINO notebooks 运行相关工具及必要项
安装Git, Anaconda, Python, C++ Redistributable (For Python 3.8)及AnacondaGit: https://git-scm.com/
Python: https://www.python.org/ftp/python/3.8.8/python-3.8.8-amd64.exe
C++ Redistributable (For Python 3.8): https://aka.ms/vs/16/release/vc_redist.x64.exe
Anaconda: https://www.anaconda.com/
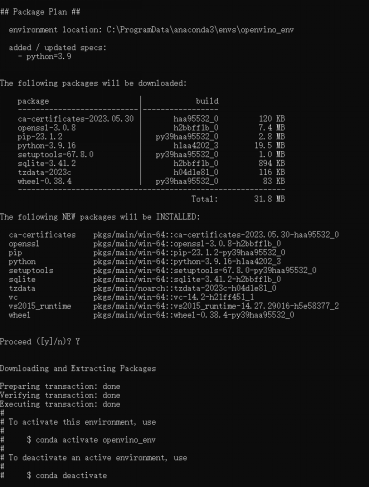
创建环境conda create -n openvino_env python=3.9
运行结果如下
启用环境openvino_env
conda activate openvino_env命令行开头有“(openvino_env)” 即为启用成功
用Git 下载OpenVINO Notebooks 库并进入资料夹
git clone --depth=1 https://github.com/openvinotoolkit/openvino_notebooks.gitcd openvino_notebooks
安装运行相关包及必须项(pip 使用清华镜像https://pypi.tuna.tsinghua.edu.cn/simple some-package)
安装约5-10分钟
python -m pip install --upgrade pip wheel setuptoolspip install -r requirements.txt -i https://pypi.tuna.tsinghua.edu.cn/simple some-package
启用OpenVINO notebook****>
jupyter lab notebooks
运行成功会跳出网页,挑选notebooks里240-dolly-2-instruction-following, 开始体验大模型的魅力及了解其机理。
LLM大模型Databricks Dolly 2.0和OpenVINO的使用说明
在本教程中,我们将研究如何使用 Dolly 2.0 和 OpenVINO 运行遵循指令的文本生成管道。我们将使用来自拥抱面变压器库中的预训练模型。为了简化用户体验,拥抱面最佳英特尔库用于将模型转换为 OpenVINO™ IR 格式。本notebooks包括以下步骤:
安装包及必要项
下载公开的模型并利用以下工具转换 OpenVINO integration with Hugging Face Optimum:https://huggingface.co/blog/openvino
建立指令推理管道(build Pipeline)
运行指令推理管道(run Pipeline)
关于 Dolly 2.0
Dolly 2.0 是在 Databricks 机器学习平台上训练的指令遵循大型语言模型,已获得商业用途许可。它基于 Pythia,并接受 Databricks 员工在各种能力领域生成的 ~15k 指令/响应微调记录的培训,包括头脑风暴、分类、封闭 QA、生成、信息提取、开放 QA 和总结。Dolly 2.0 的工作原理是处理自然语言指令并生成遵循给定指令的响应。它可用于广泛的应用,包括封闭式问答、总结和生成。模型训练过程的灵感来自InstructGPT。为了训练InstructGPT模型,核心技术是从人类反馈(RLHF)中强化学习,这种技术使用人类偏好作为奖励信号来微调模型,这很重要,因为需要解决的安全和对齐问题是复杂和主观的,并且不能完全被简单的自动指标捕获。有关 InstructGPT 方法的更多详细信息,请参阅 OpenAI 博客文章
InstructGPT发现的突破是语言模型不需要越来越大的训练集。通过使用人工评估的问答训练,作者能够使用比以前的模型少一百倍的参数来训练更好的语言模型。Databricks使用类似的方法来创建一个提示和响应数据集,称为databricks-dolly-15k,这是一个由数千名Databricks员工生成的超过15,000条记录的语料库,使大型语言模型能够展示InstructGPT的神奇交互性。有关模型和数据集的更多详细信息,请参阅 Databricks 博客文章和存储库
Hugging Face Optimum Intel API
首先,我们用以下代码安装由OpenVINO集成Hugging Face Optimum库。Hugging Face Optimum intel API 是一个high-level API,使我们能够将Hugging Face Transformers library中的模型转换和量化为 OpenVINO™ IR 格式。有关更多详细信息,请参阅Hugging Face Optimum Intel documentation文档。
!pip install -q "diffusers>=0.16.1" "transformers>=4.28.0" !pip install -q "git+https://github.com/huggingface/optimum-intel.git" datasets onnx onnxruntime gradio 下载及转换模型(注意:此模型大小约10GB)
Optimal Intel 可从Hugging Face Hub加载优化模型,并可创建Pipeline用OpenVINO run time并调用Hugging Face APIs运行推理。Optimum推理模型与Hugging Face Transformers模型的 API 是兼容。这意味着我们只需要将 AutoModelForXxx 类替换为相应的 OVModelForXxx 类即可。下面是Dolly model的示例
-from transformers import AutoModelForCausalLM
+from optimum.intel.openvino import OVModelForCausalLM
from transformers import AutoTokenizer, pipeline

model_id = "databricks/dolly-v2-3b"
-model = AutoModelForCausalLM.from_pretrained(model_id)
+model = OVModelForCausalLM.from_pretrained(model_id, from_transformers=True)
模型类初始化从调用 from_pretrained开始。当下载及转换模型, 需添加此参数from_transformers=True。我们用save_pretrained储存转换模型。 Tokenizer class and pipelines API 是与Optimus 模型兼容的。
from pathlib import Path
from transformers import AutoTokenizer
from optimum.intel.openvino import OVModelForCausalLM

model_id = "databricks/dolly-v2-3b"
model_path = Path("dolly-v2-3b")

tokenizer = AutoTokenizer.from_pretrained(model_id)

current_device = "CPU"

if model_path.exists():
    ov_model = OVModelForCausalLM.from_pretrained(model_path, device=current_device)
else:
    ov_model = OVModelForCausalLM.from_pretrained(model_id, device=current_device, from_transformers=True)
    ov_model.save_pretrained(model_path)
运行结果

创建遵循指令的推理管道(Inference Pipeline)
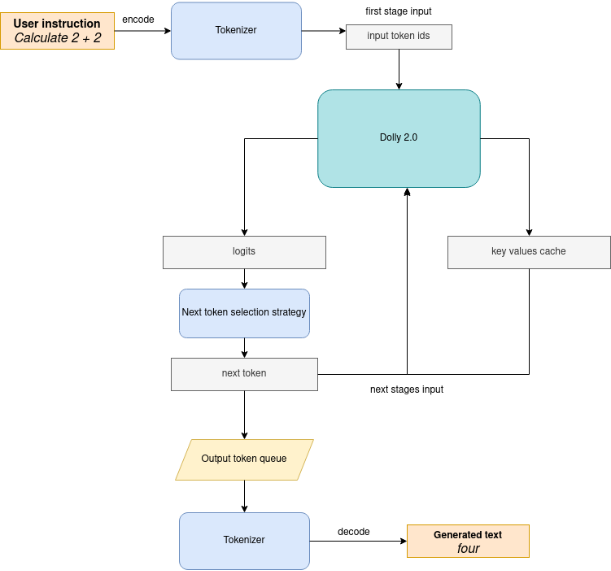
run_generation函数接受用户提供的文本输入,对其进行令牌 (Token)化,然后运行生成过程。文本生成是一个迭代过程,其中每个下一个标记都依赖于先前生成的令牌,直到达到最大令牌数或停止生成条件。为了获得中间生成结果而不需等到生成完成,我们将使用 TextIteratorStreamer,作为 HuggingFace Streaming API 的一部分提供。下图说明了指令遵循管道的工作原理
可以看出,在第一次迭代中,用户提供的指令使用分词器转换为令牌ID,然后准备的输入提供给模型。该模型以 logits 格式为所有令牌生成概率 在预测概率上选择下一个令牌的方式由所选解码方法驱动。您可以在此博客中找到有关最流行的解码方法的更多信息。
有几个参数可以控制文本生成质量:
Temperature是用于控制 AI 生成文本中创造力水平的参数。通过调整Temperature,您可以影响 AI 模型的概率分布,使文本更加集中或多样化。考虑以下示例:AI 模型必须使用以下令牌概率完成句子 “The cat is ____.” :
playing: 0.5
sleeping: 0.25
eating: 0.15
driving: 0.05
flying: 0.05
oLow temperature (e.g., 0.2): AI模型变得更加集中和确定性,选择概率最高的令牌,例如 "playing."
oMedium temperature (e.g., 1.0): AI模型在创造力和专注力之间保持平衡,根据其概率选择令牌,没有明显的偏见,例如 "playing," "sleeping," or "eating."
oHigh temperature (e.g., 2.0): AI模型变得更加冒险,增加了选择不太可能的令牌的机会,例如 "driving" and "flying."
Top-p也称为核心采样 (nucleus sampling),用于根据累积概率控制 AI 模型考虑的令牌范围的参数。通过调整Top-p 值,您可以影响 AI 模型的令牌选择,使其更加集中或多样化。对相同的示例 cat ,请考虑以下top_p设置:
oLow top_p (e.g., 0.5): AI 模型仅考虑累积概率最高的令牌,例如 "playing."
oMedium top_p (e.g., 0.8): AI 模型考虑具有较高累积概率的令牌,例如 "playing," "sleeping," and "eating."
oHigh top_p (e.g., 1.0): AI 模型考虑所有令牌,包括概率较低的令牌,例如 "driving" and "flying."
Top-k 是另一种流行的采样策略。与 Top-P 进行比较,Top-P 从累积概率超过概率 P 的最小可能单词组进行选择,在 Top-K 抽样中,K 最有可能被过滤掉下一个单词,并且概率质量仅在下一个 K 个单词之间重新分配。在我们的 cat 示例中,如果 k=3,则只有“playing”、“sleeping”和“eathing”将被考虑为下一个单词。
为了优化生成过程并更有效地使用内存,请启用 use_cache=True 选项。由于输出端是自动回归的,因此输出令牌隐藏状态在计算后每进一步生成步骤后保持不变。因此,每次想要生成新令牌时重新计算它似乎很浪费。使用缓存,模型会在计算后保存成隐藏状态。该模型仅在每个时长计算最近要生成的输出令牌的令牌,将保存的令牌重用于隐藏令牌。这将transformer模型的生成复杂度从 O(n^3) 降低到 O(n^2)。有关其工作原理的更多详细信息,请参阅本文。使用此选项,模型获取上一步的隐藏状态(缓存的attention keys和values)作为输入,此外还提供当前步骤的隐藏状态作为输出。这意味着对于所有后续迭代,只需提供从上一步获得的新令牌和缓存的键值即可获得下一个令牌预测。
生成周期重复,直到到达序列令牌的末尾,或者在生成最大令牌时中断。如前所述,我们可以启用打印当前生成的令牌,而无需等到整个生成完成使用Streaming API 时,它会将新令牌添加到输出队列,然后在它们准备就绪时打印(print)它们。
运行指令推理管道(run Pipeline)
输入设定
from threading import Thread
from time import perf_counter
from typing import List
import gradio as gr
from transformers import AutoTokenizer, TextIteratorStreamer
import numpy as np
为user prompt 准备模板
为了有效生成,模型期望具有特定格式的输入。下面的代码准备了将用户指令传递到模型中的模板,并提供额外的上下文。INSTRUCTION_KEY = "### Instruction:"
RESPONSE_KEY = "### Response:"
END_KEY = "### End"
INTRO_BLURB = (
"Below is an instruction that describes a task. Write a response that appropriately completes the request."
)
# This is the prompt that is used for generating responses using *****ready trained model. It ends with the response
# key, where the job of the model is to provide the completion that follows it (i.e. the response itself).
PROMPT_FOR_GENERATION_FORMAT = """{intro}
{instruction_key}
{instruction}
{response_key}
""".format(
intro=INTRO_BLURB,
instruction_key=INSTRUCTION_KEY,
instruction="{instruction}",
response_key=RESPONSE_KEY,
)
输出分析的帮助程序
模型被重新训练以使用特殊令牌 ### End完成生成,下面的代码找到它的 id 并用它当作停止标准(stop-criteria)。def get_special_token_id(tokenizer: AutoTokenizer, key: str) -> int:
"""
Gets the token ID for a given string that ha***een added to the tokenizer as a special token.
When training, we configure the tokenizer so that the sequences like "### Instruction:" and "### End" are
treated specially and converted to a single, new token. This retrieves the token ID each of these key***ap to.
Args:
tokenizer (PreTrainedTokenizer): the tokenizer
key (str): the key to convert to a single token
Raises:
RuntimeError: if more than one ID was generated
Returns:
int: the token ID for the given key
"""
token_ids = tokenizer.encode(key)
if len(token_ids) > 1:
raise ValueError(f"Expected only a single token for '{key}' but found {token_ids}")
return token_ids[0]
tokenizer_response_key = next((token for token in tokenizer.additional_special_tokens if token.startswith(RESPONSE_KEY)), None)
end_key_token_id = None
if tokenizer_response_key:
try:
end_key_token_id = get_special_token_id(tokenizer, END_KEY)
# Ensure generation stops once it generates "### End"
except ValueError:
pass 主要生成功能代码
如上所述,run_generation函数是开始生成的开始点。它获得提供的输入指令作为参数并返回模型响应。def run_generation(user_text:str, top_p:float, temperature:float, top_k:int, max_new_tokens:int, perf_text:str):
"""
Text generation function
Parameters:
user_text (str): User-provided instruction for a generation.
top_p (float): Nucleus sampling. If set to < 1, only the **allest set of most probable tokens with probabilities that add up to top_p or higher are kept for a generation.
temperature (float): The value used to module the logits distribution.
top_k (int): The number of highest probability vocabulary tokens to keep for top-k-filtering.
max_new_tokens (int): Maximum length of generated sequence.
perf_text (str): Content of text field for printing performance results.
Returns:
model_output (str) - model-generated text
perf_text (str) - updated perf text filed content
"""
# Prepare input prompt according to model expected template
prompt_text = PROMPT_FOR_GENERATION_FORMAT.format(instruction=user_text)
# Tokenize the user text.
model_inputs = tokenizer(prompt_text, return_tensors="pt")
# Start generation on a separate thread, so that we don't block the UI. The text is pulled from the streamer
# in the main thread. Adds timeout to the streamer to handle exceptions in the generation thread.
streamer = TextIteratorStreamer(tokenizer, skip_prompt=True, skip_special_tokens=True)
generate_kwargs = dict(
model_inputs,
streamer=streamer,
max_new_token***ax_new_tokens,
do_sample=True,
top_p=top_p,
temperature=float(temperature),
top_k=top_k,
eos_token_id=end_key_token_id
)
t = Thread(target=ov_model.generate, kwargs=generate_kwargs)
t.start()
# Pull the generated text from the streamer, and update the model output.
model_output = ""
per_token_time = []
num_tokens = 0
start = perf_counter()
for new_text in streamer:
current_time = perf_counter() - start
model_output += new_text
perf_text, num_tokens = estimate_latency(current_time, perf_text, new_text, per_token_time, num_tokens)
yield model_output, perf_text
start = perf_counter()
return model_output, perf_text 应用UI助手
为了制作交互式用户界面,我们将使用Gradio库。下面的代码提供了用于与 UI 元素通信的有用函数。def estimate_latency(current_time:float, current_perf_text:str, new_gen_text:str, per_token_time:List[float], num_tokens:int):
"""
Helper function for performance estimation
Parameters:
current_time (float): This step time in seconds.
current_perf_text (str): Current content of performance UI field.
new_gen_text (str): New generated text.
per_token_time (List[float]): history of performance from previous steps.
num_tokens (int): Total number of generated tokens.
Returns:
update for performance text field
update for a total number of tokens
"""
num_current_toks = len(tokenizer.encode(new_gen_text))
num_tokens += num_current_toks
per_token_time.append(num_current_toks / current_time)
if len(per_token_time) > 10 and len(per_token_time) % 4 == 0:
current_bucket = per_token_time[:-10]
return f"Average generaton speed: {np.mean(current_bucket):.2f} tokens/s. Total generated tokens: {num_tokens}", num_tokens
return current_perf_text, num_tokens
def reset_textbox(instruction:str, response:str, perf:str):
"""
Helper function for resetting content of all text fields
Parameters:
instruction (str): Content of user instruction field.
response (str): Content of model response field.
perf (str): Content of performance info filed
Returns:
empty string for each placeholder
"""
return "", "", ""
def select_device(device_str:str, current_text:str = "", progress:gr.Progress = gr.Progress()):
"""
Helper function for uploading model on the device.
Parameters:
device_str (str): Device name.
current_text (str): Current content of user instruction field (used only for backup purposes, temporally replacing it on the progres***ar during model loading).
progress (gr.Progress): gradio progress tracker
Returns:
current_text
"""
if device_str != ov_model._device:
ov_model.request = None
ov_model._device = device_str
for i in progress.tqdm(range(1), desc=f"Model loading on {device_str}"):
ov_model.compile()
return current_text 运行指令遵循管道(instruction-following pipeline)
现在,我们已准备好探索模型功能。请运行以下代码from openvino.runtime import Core
core = Core()
available_devices = core.available_devices
examples = [
"Give me recipe for pizza with pineapple",
"Write me a tweet about new OpenVINO release",
"Explain difference between CPU and GPU",
"Give five ideas for great weekend with family",
"Do Androids dream of Electric sheep?",
"Who is Dolly?",
"Please give me advice how to write resume?",
"Name 3 advantages to be a cat",
"Write instructions on how to become a good AI engineer",
"Write a love letter to my best friend",
]
with gr.Blocks() as demo:
gr.Markdown(
"# Instruction following using Databricks Dolly 2.0 and OpenVINO.\n"
"Provide insturction which describes a task below or select among predefined examples and model writes response that performs requested task."
)
with gr.Row():
with gr.Column(scale=4):
user_text = gr.Textbox(
placeholder="Write an email about *****paca that likes flan",
label="User instruction"
)
model_output = gr.Textbox(label="Model response", interactive=False)
performance = gr.Textbox(label="Performance", lines=1, interactive=False)
with gr.Column(scale=1):
button_clear = gr.Button(value="Clear")
button_submit = gr.Button(value="Submit")
gr.Examples(examples, user_text)
with gr.Column(scale=1):
device = gr.Dropdown(choices=available_devices, value=current_device, label="Device")
max_new_tokens = gr.Slider(
minimum=1, maximum=1000, value=256, step=1, interactive=True, label="Max New Tokens",
)
top_p = gr.Slider(
minimum=0.05, maximum=1.0, value=0.92, step=0.05, interactive=True, label="Top-p (nucleus sampling)",
)
top_k = gr.Slider(
minimum=0, maximum=50, value=0, step=1, interactive=True, label="Top-k",
)
temperature = gr.Slider(
minimum=0.1, maximum=5.0, value=0.8, step=0.1, interactive=True, label="Temperature",
)
user_text.submit(run_generation, [user_text, top_p, temperature, top_k, max_new_tokens, performance], [model_output, performance])
button_submit.click(select_device, [device, user_text], [user_text])
button_submit.click(run_generation, [user_text, top_p, temperature, top_k, max_new_tokens, performance], [model_output, performance])
button_clear.click(reset_textbox, [user_text, model_output, performance], [user_text, model_output, performance])
device.change(select_device, [device, user_text], [user_text])
if __name__ == "__main__":
try:
demo.launch(enable_queue=True, share=False, height=800)
except Exception:
demo.launch(enable_queue=True, share=True, height=800) 运行结果
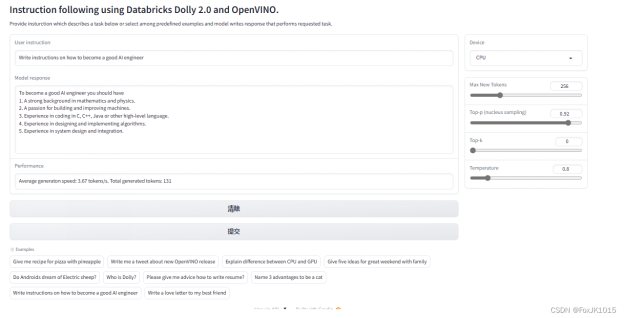
此演示提供了一个简单的界面,允许使用文本指令与模型进行通信。在“User instruction” 字段中键入您的指令,或从预定义的示例中选择一个指令,然后单击 “Submit”按钮开始生成。此外,您还可以修改高级生成参数:Device - 允许切换推理设备。请注意,每次选择新设备时,都会重新编译模型,这需要一些时间。
Max New Tokens - 生成文本的最大尺寸。.
Top-p (nucleus sampling) - 如果设置为 < 1,则只有概率加起来为 top_p 或更高的最小概率的最小标记集一代保留。
Top-k - 保留用于 top-k-filtering 的最高概率词汇令牌的数量。
Temperature - 用于对数分布 (logits distribution) 进行模块化的值
以下运行结果约2分钟,
范例1: Write instruction on how to become a good AI engineer
范例2: Who is Dolly?

范例2: Explain difference between CPU and GPU?
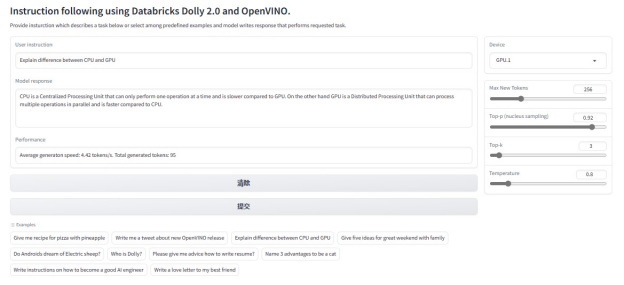
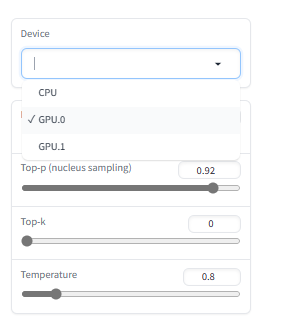
以下是右侧设备选择(GPU.0为iGPU;GPU.1为Intel Arc及各参数调控局部放大图)
结语:
Dolly 2.0是第一个开源的,遵循指令的LLM,由Databricks在一个透明且免费提供的数据集上进行微调,该数据集也是开源的,可用于商业目的。这意味着 Dolly 2.0 可用于商业应用程序,而无需支付 API 访问费用或与第三方共享数据。Intel OpenVINO notebooks 展示了此LLM开源代码及原理注释, 配合intel Arc显卡在基于Gradio库做了一个用户界面让开发者可亲自体验单机版的GPT示例, 感受大语言模型的魅力。
关于原基科技(原基科技 (easy-ba******.cn))
深圳市原基科技有限公司,坐落于深圳科技新区的光明新区,专注于嵌入式主板和工控电脑、AI盒子、边缘计算服务器的研发、定制以及解决方案,是一家集研发、生产、销售、服务为一体的国家高新技术型企业,致力于为大数据、物联网、人工智能的发展提供解决方案。
主要核心骨干均为从事本行业10年以上的资深人员,依据丰富的经验和ISO9001体系的指导,设立了运营部、产品部、研发部、供应链、品质部等,具备了主板的研发设计、生产线的DIP、SMT以及整机的组装测试的能力。目前拥有20多项自主知识产权, 获评为国家高新技术企业且通ISO9001认证。
主要业务涉及智慧社区、智慧园区、智慧零售、智慧教育、智慧办公、智慧安防、智慧工业等领域;凭借灵活、快速响应的特点,得到了客户的大量认可。
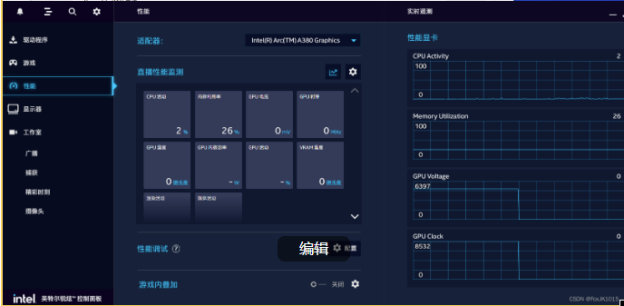
Intel Arc显卡驱动安装
Intel® Arc™ 与 Iris® Xe 显示芯片 - WHQL - Windows*下载并安装Intel Arc驱动安装完毕确认版本如下图为31.0.101.4369, 并在左侧性能确认显卡设备已有A380选项