AI爱克斯开发板上OpenVINO处理U2-Net模型的图像分割和背景替换
 openlab_4276841a
更新于 2年前
openlab_4276841a
更新于 2年前
作者:康瑶明 - 英特尔边缘计算创新大使
一.AIxBoard介绍
1.背景
AIxBoard(爱克斯板)由2023年蓝蛙智能推出的人工智能嵌入式开发板,是英特尔开发套件官方序列中的一员,专为支持入门级人工智能应用和边缘智能设备而设计。它体积小巧功能强大,是一款面向专业创客、开发者的功能强大的小型计算机,借助OpenVINO工具套件,CPU、iGPU都具备强劲的AI推理能力,支持在图像分类、目标检测、分割和语音处理等应用中并行运行多个神经网络。
2.配置
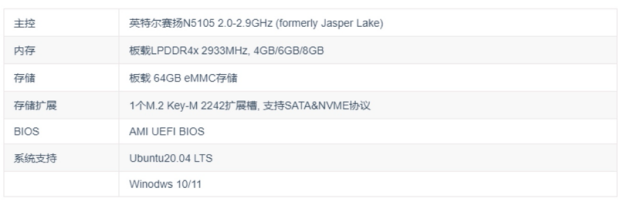
3.算力
借助OpenVINO工具,能够实现CPU+iGPU异构计算推理,IGPU算力约为0.6TOPS

4.优势
• 开箱即用,不需要额外购买配件,不需要烧写系统,通电即用
• 性价比高,板载8G内存,64GB存储,WiFi6千兆无线网卡,CPU+iGPU异构计算
• 通用性好,流畅运行Win10/Win11,桌面Linux,软件兼容性好
• 易用性佳,提供丰富的案例资源,学习门槛低
• 官方认证,英特尔官方推荐开发套件,品质有保证
• 个性定制,可更换开机Logo,产品个性化定制
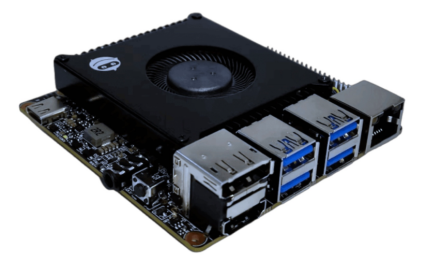
5.实物图
二.环境配置
1.下载安装anaconda
推荐使用国内清华源,可以加速下载
https://mirrors.tuna.tsinghua.edu.cn/anaconda/archive/
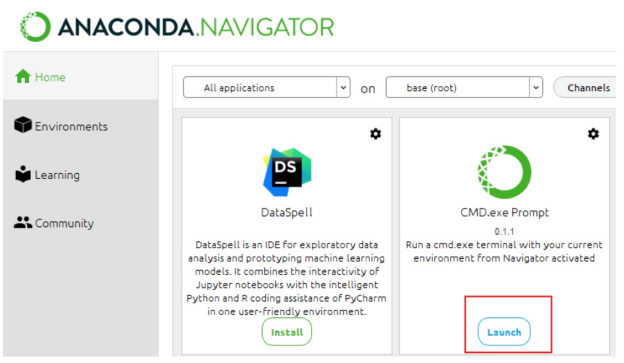
根据提示安装完成后,打开anaconda:

点击命令行工具如下图:
更新conda

pip更换清华源:
pip config set global.index-url https://pypi.tuna.tsinghua.edu.cn/simple

2.安装openvino package
详情可参见官网:https://www.intel.cn/content/www/cn/zh/developer/tools/openvino-toolkit/download.html?ENVIRONMENT=DEV_TOOLS&OP_SYSTEM=WINDOWS&VERSION=v_2023_0_1&DISTRIBUTION=PIP&FRAMEWORK=ONNX%2CPYTORCH%2CTENSORFLOW_2
pip install openvino-dev[ONNX,pytorch,tensorflow2]==2023.0.1
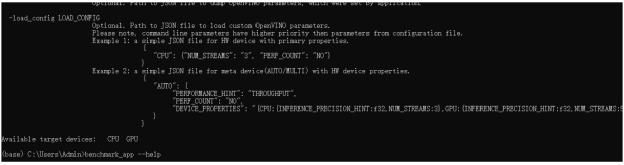
3.检查是否安装成功
使用以下命令可以查看到openvino识别到支持的设备为CPU和GPU。如下图所示,此时说明安装成功,可以找到推理设备。
benchmark_app –help
三.U2-Net模型的图像分割和背景替换演示
下载仓库:
git clone https://github.com/openvinotoolkit/openvino_notebooks.git
1.模型介绍
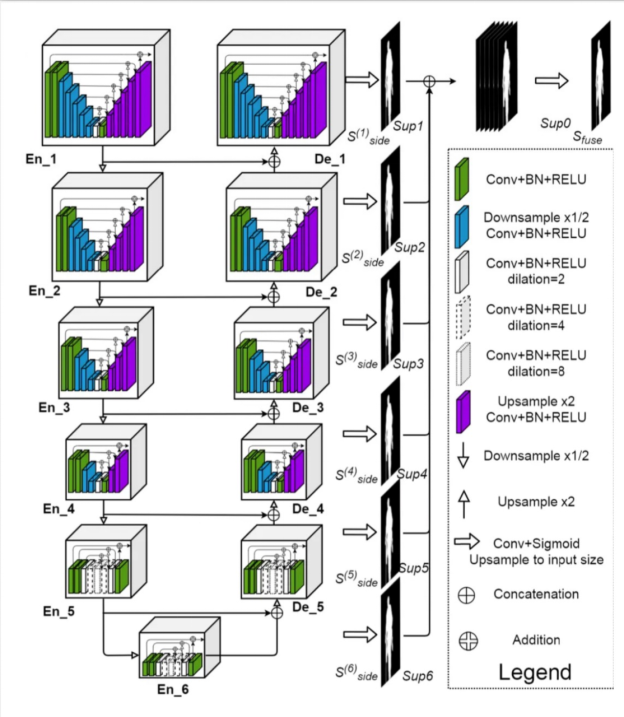
U2-Net在RSU的基础上开发的,用于显著目标检测(SOD),解决了在保持高分辨率特征图的同时,以较低的内存和计算成本使网络变得更深。U2网络是一个两层嵌套的U型结构,如下图所示。它的top-level是一个由11个阶段组成的大U型结构(图中的立方体)。每一阶段都由一个配置良好的残差Ublock(RSU)(bottom level U结构)填充。因此,嵌套U结构能够更有效地提取阶段内多尺度特征和聚合阶段间多级特征。
2.模型下载
u2net_lite = model_config(
name="u2net_lite",
url="https://drive.google.com/uc?id=1rbSTGKAE-MTxBYHd-51l2hMOQPT_7EPy",
model=U2NETP,
model_args=(),
)
model_path = Path(MODEL_DIR) / u2net_model.name / Path(u2net_model.name).with_suffix(".pth")
执行上述代码,下载原模型文件。

3.导出onnx
加载模型和预训练的权重文件,导出到onnx格式。pytorch把所有的模型参数用一个内部定义的dict进行保存,称为state_dict。
# Load the model.
net = u2net_model.model(*u2net_model.model_args)
net.eval()
# Load the weights.
print(f"Loading model weights from: '{model_path}'")
net.load_state_dict(state_dict=torch.load(model_path, map_location="cpu"))
torch.onnx.export(net, torch.zeros((1,3,512,512)), "u2net.onnx")

4.转化为IR格式
使用模型优化器Python API将Pytorch模型转换为 OpenVINO IR格式,精度为FP16。将平均值添加到模型中,并使用带有scale_values参数的标准偏差缩放输入。使用这些选项,无需在通过网络传播输入数据之前对其进行规范化。平均值和标准偏差值可以在 U2-Net 存储库的dataloader文件中找到,并乘以255以支持像素值为0-255的图像。
model_ir = mo.convert_model(
"u2net.onnx",
mean_values=[123.675, 116.28 , 103.53],
scale_values=[58.395, 57.12 , 57.375],
compress_to_fp16=True
)
5.图片预处理
OpenVINO IR模型需要RGB格式的图像。将图像转换为 RGB,将其大小调整为 512 x 512,并将尺寸转置为 OpenVINO IR 模型所需的格式。
IMAGE_URI = "https://storage.openvinotoolkit.org/repositories/openvino_notebooks/data/data/image/coco_hollywood.jpg"
image = cv2.cvtColor(
src=load_image(IMAGE_URI),
code=cv2.COLOR_BGR2RGB,
)
resized_image = cv2.resize(src=image, dsize=(512, 512))
input_image = np.expand_dims(np.transpose(resized_image, (2, 0, 1)), 0)
6.执行推理
加载模型网络到OpenVINO Runtime,device_name指定为CPU设备进行推理。
# Load the network to OpenVINO Runtime.
ie = Core()
compiled_model_ir = ie.compile_model(model=model_ir, device_name="CPU")
# Get the names of input and output layers.
input_layer_ir = compiled_model_ir.input(0)
output_layer_ir = compiled_model_ir.output(0)
# Do inference on the input image.
start_time = time.perf_counter()
result = compiled_model_ir([input_image])[output_layer_ir]
end_time = time.perf_counter()
print(
f"Inference finished. Inference time: {end_time-start_time:.3f} seconds, "
f"FPS: {1/(end_time-start_time):.2f}."
)
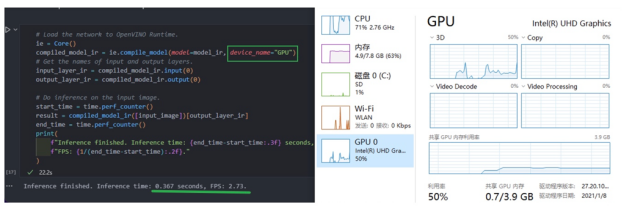
推理完成后,可以看到打印的执行时间和FPS值,如下图:

设备切换为GPU后可以看到推理时间缩短了近10倍,FPS也提高了近10倍。然而看到任务管理器GPU利用率才50%左右,这说明GPU的加速效果还是很可观的。
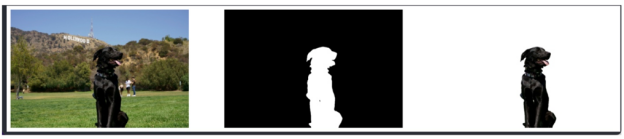
7.结果可视化
经过opencv处理后,从左到右分别是原始图像、分割结果和去除背景的原始图像。
resized_result = np.rint(
cv2.resize(src=np.squeeze(result), dsize=(image.shape[1], image.shape[0]))
).astype(np.uint8)
# Create a copy of the image and set all background values to 255 (white).
bg_removed_result = image.copy()
bg_removed_result[resized_result == 0] = 255
fig, ax = plt.subplots(nrows=1, ncols=3, figsize=(20, 7))
ax[0].imshow(image)
ax[1].imshow(resized_result, cmap="gray")
ax[2].imshow(bg_removed_result)
for a in ax:
a.axis("off")
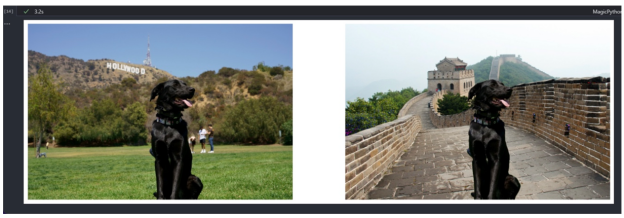
8.添加背景
通过cv2.cvtColor方法,读取到新的长城背景图片,经过转置等操作,给狗狗替换了新的长城背景图片。
background_image = cv2.cvtColor(src=load_image(BACKGROUND_FILE), code=cv2.COLOR_BGR2RGB)
background_image = cv2.resize(src=background_image, dsize=(image.shape[1], image.shape[0]))
# Set all the foreground pixels from the result to 0
# in the background image and add the image with the background removed.
background_image[resized_result == 1] = 0
new_image = background_image + bg_removed_result
# Save the generated image.
new_image_path = Path(f"{OUTPUT_DIR}/{Path(IMAGE_URI).stem}-{Path(BACKGROUND_FILE).stem}.jpg")
cv2.imwrite(filename=str(new_image_path), img=cv2.cvtColor(new_image, cv2.COLOR_RGB2BGR))
# Display the original image and the image with the new background side by side
fig, ax = plt.subplots(nrows=1, ncols=2, figsize=(18, 7))
ax[0].imshow(image)
ax[1].imshow(new_image)
for a in ax:
a.axis("off")
plt.show()
四. 结论
AI爱克斯开发板,板载8G内存,64GB存储,WiFi6千兆无线网卡,CPU+iGPU异构计算,还有一个M.2插槽支持可扩展硬盘。搭载的Intel Celeron N5105是Jaser Lake系列的四核处理器,被定位为嵌入式CPU,不管是性能,还是功耗,散热都做的非常不错。在测试中,内置的集成显卡可以在U2-Net模型的加速推理时间缩短近10倍,FPS也提高了近10倍。然而GPU利用率才50%左右,这说明GPU的加速效果还是很可观的,还有潜力进一步释放算力,是AI开发者的趁手利器。