【爱克斯开发板试用】将爱克斯板用于第十八届全国大学生智能汽车竞赛--百度智慧交通
 openlab_24a9f6dc
更新于 2年前
openlab_24a9f6dc
更新于 2年前
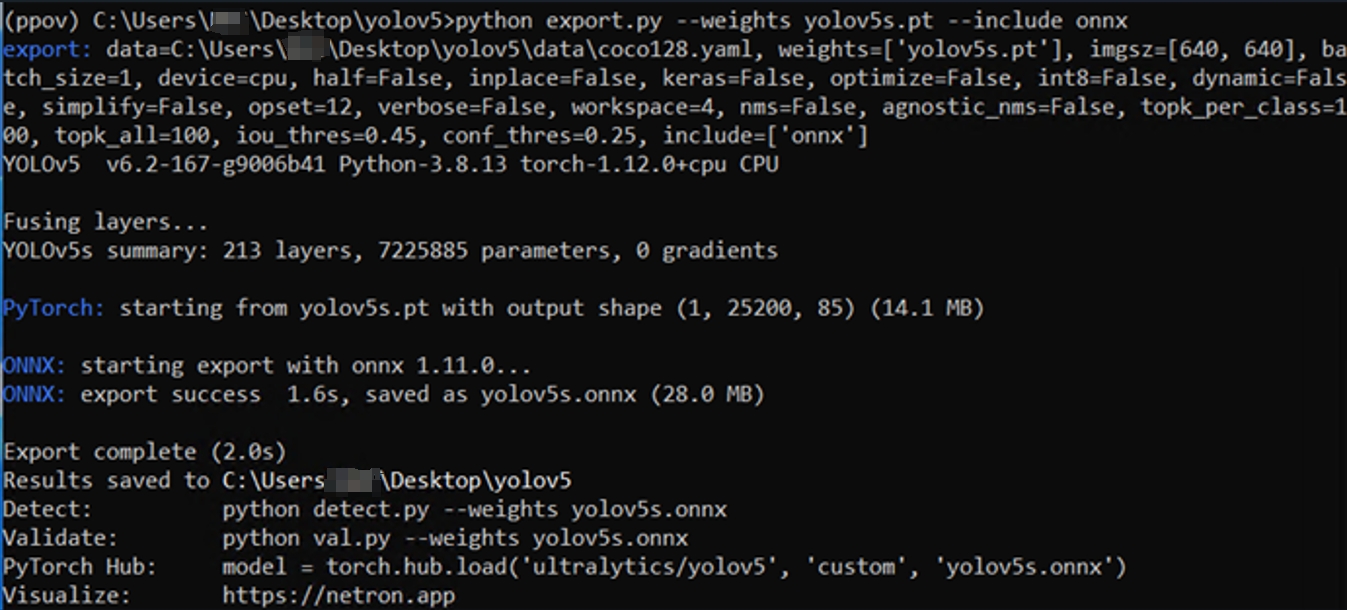
一、导出 yolov5s.onnx 模型
基于原有的数据集训练出yolov5s模型,并在训练机的 YOLOv5 文件夹下,使用命令:
python export.py --weights yolov5s.pt --include onnx
完成 yolov5s.onnx 模型导出,如下图所示:
二、在爱克斯开发板上安装
1、安装OpencvVINO
pip install openvino-dev==2022.3.0
pip install openvino==2022.3.0

2、安装opencv
pip install opencv-python

三、ONNX转换为IR指令
将对应的best.onnx取名为baiduCar.onnx,上传到爱克斯开发板上,然后使用下列指令进行转换:
mo --input_model baiduCar.onnx --data_type FP16
转换成功后,当前文件夹下会出现baiduCar.xml和baiduCar.bin两个文件。

四、视频推理
将需推理的视频放在当前文件夹下,并新建test.py文件,将以下内容**粘贴到test.py中:
import cv2
import time
import yaml
import openvino.preprocess as op
import numpy as np
from openvino.runtime import Core
import openvino.runtime as ov
def resizeimg(image, new_shape):
old_size = image.shape[:2]
#记录新形状和原生图像矩形形状的比率
ratio = float(new_shape[-1] / max(old_size))
new_size = tuple([int(x * ratio) for x in old_size])
image = cv2.resize(image, (new_size[1], new_size[0]))
delta_w = new_shape[1] - new_size[1]
delta_h = new_shape[0] - new_size[0]
color = [100, 100, 100]
new_im = cv2.copyMakeBorder(image, 0, delta_h, 0, delta_w, cv2.BORDER_CONSTANT, value=color) #增广操作
return new_im, delta_w, delta_h
core = ov.Core()
#读取用YOLOv5模型转换而来的IR模型
model = core.read_model("baiduCar.xml", "baiduCar.bin")
#运用PPP(PrePostProcessor)对模型进行预处理
Premodel = op.PrePostProcessor(model)
Premodel.input().tensor().set_element_type(ov.Type.u8).set_layout(ov.Layout("NHWC")).set_color_format(op.ColorFormat.BGR)
Premodel.input().preprocess().convert_element_type(ov.Type.f32).convert_color(op.ColorFormat.RGB).scale(
[255., 255., 255.])
Premodel.input().model().set_layout(ov.Layout("NCHW"))
Premodel.output(0).tensor().set_element_type(ov.Type.f32)
model = Premodel.build()
compiled_model = core.compile_model(model, "GPU") #加载模型,可用CPU or GPU
infer_request = compiled_model.create_infer_request() #生成推理
cap = cv2.VideoCapture("output0331_2.mp4")
while 1:
start = time.time()
ret, img = cap.read()
if not ret:
break
img_re,dw,dh = resizeimg(img,(640,640)) #尺寸处理
input_tensor = np.expand_dims(img_re, 0) #获得输入张量
infer_request.infer({0: input_tensor}) #输入到推理引擎
output = infer_request.get_output_tensor(0) #获得推理结果
detections = output.data[0] #获得检测数据
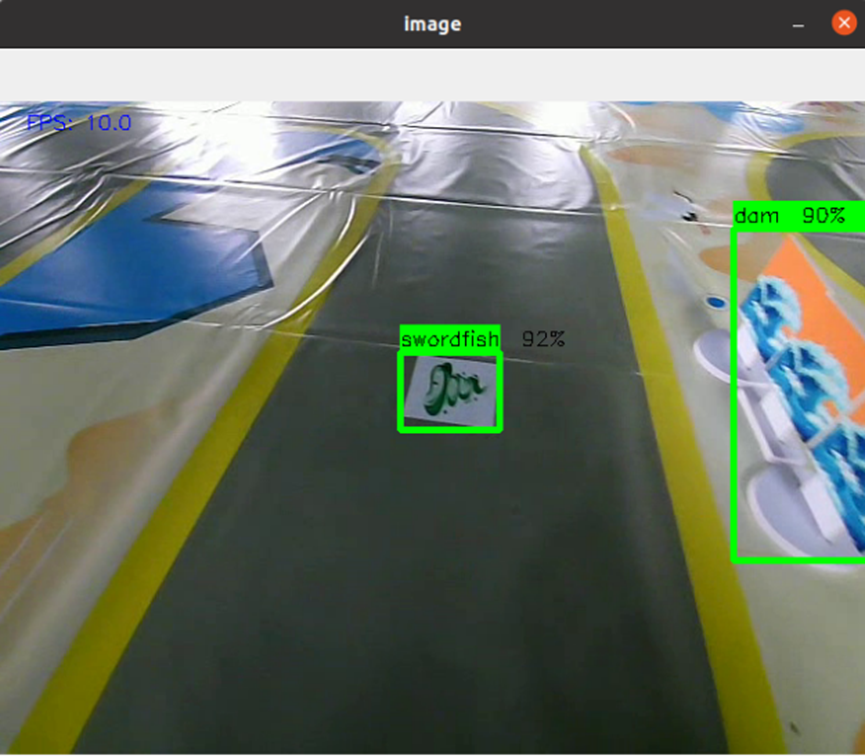
label = ['tower','hhl','yyl','twg','barge','trade','konjac','citrus','swordfish','tornado','spray','dam','vortex']
push =[]
boxes = []
class_ids = []
confidences = []
for prediction in detections:
confidence = prediction[4].item() #获取置信度
if confidence >= 0.6: #初步过滤,过滤掉绝大多数的无效数据
classes_scores = prediction[5:]
_, _, _, max_indx = cv2.minMaxLoc(classes_scores)
class_id = max_indx[1]
if (classes_scores[class_id] > .25):
confidences.append(confidence)
class_ids.append(class_id)
x, y, w, h = prediction[0].item(), prediction[1].item(), prediction[2].item(), prediction[3].item() #获取有效信息
xmin = x - (w / 2) #由于NMSBoxes缘故,需要从中心点得到左上角点
ymin = y - (h / 2)
box = np.array([xmin, ymin, w, h]) #记录数据
boxes.append(box)
indexes = cv2.dnn.NMSBoxe***oxes, confidences, 0.5, 0.5) #NMS筛选
detections = []
for i in indexes:
j = i.item()
detections.append({"class_index": class_ids[j], "confidence": confidences[j], "box": boxes[j]}) #储存获取的目标名称和框选位
for detection in detections:
box = detection["box"]
classId = detection["class_index"]
confidence = detection["confidence"]
if(confidence<0.88): #再次过滤
continue
else :
push.append(classId)
rx = img.shape[1] / (img_re.shape[1] - dw)
ry = img.shape[0] / (img_re.shape[0] - dh)
img_re = cv2.rectangle(img_re, (int(box[0]), int(box[1])), (int(box[0] + box[2]), int(box[1] + box[3])), (0, 255, 0), 3)
box[0] = rx * box[0] #恢复原尺寸box,如果尺寸不变可以忽略
box[1] = box[1] *ry
box[2] = rx * box[2]
box[3] = box[3] *ry
xmax = box[0] + box[2]
ymax = box[1] + box[3]
img = cv2.rectangle(img, (int(box[0]), int(box[1])), (int(xmax), int(ymax)), (0, 255, 0), 3) #绘制物体框
img = cv2.rectangle(img, (int(box[0]), int(box[1]) - 20), (int(xmax), int(box[1])), (0, 255, 0), cv2.FILLED) #绘制目标名称底色填充矩形
img = cv2.putText(img, str(label[classId])+' '+str(int(confidence*100))+'%', (int(box[0]), int(box[1]) - 5), cv2.FONT_HERSHEY_SIMPLEX, 0.5, (0, 0, 0)) #绘制目标名称
img = cv2.putText(img, 'FPS: ' + str(1//(time.time() - start)), (20, 20), cv2.FONT_HERSHEY_SIMPLEX, 0.5, (255, 0, 0))
cv2.imshow('image',img)
cv2.waitKey(1)
运行指令完成推理
python test.py
五、安装ROS
Ubuntu20.04推荐安装noetic版本的ROS
sudo apt update
sudo apt upgrade
# 设置sources.list
sudo sh -c 'echo "deb http://packages.ros.org/ros/ubuntu $(l**_release -sc) main" > /etc/apt/sources.list.d/ros-latest.list'
# 如果****较慢,使用以下命令替换上面的命令
sudo sh -c '. /etc/l**-release && echo "deb http://mirrors.tuna.tsinghua.edu.cn/ros/ubuntu/ `l**_release -cs` main" > /etc/apt/sources.list.d/ros-latest.list'
# 如果依然遇到连接失败问题,请尝试换源https://developer.aliyun.com/mirror/ubuntu
# 设置密钥
sudo apt-key adv --keyserver 'hkp://keyserver.ubuntu.com:80' --recv-key C1CF6E31E6BADE8868B172B4F42ED6FBAB17C654
# 若无法连接到密钥服务器,可以尝试替换上面命令中的 hkp://keyserver.ubuntu.com:80 为 hkp://pgp.mit.edu:80 。
sudo apt update
sudo apt install ros-noetic-desktop
sudo apt install python3-rosdep
sudo rosdep init
rosdep update
# 设置环境
echo "source /opt/ros/noetic/setup.bash" >> ~/.bashrc
source ~/.bashrc
# 安装依赖
sudo apt-get install ros-noetic-camera-info-manager
六、放置ROS包
解压car_ws 到主目录下,在目录下打开终端,运行指令
catkin_make
再运行 gedit ~/.bashrc 打开配置文件,在最下方加入
source ~/car_ws/devel/setup.bash
七、总结
本文介绍了在AIxBoard上搭建ROS+OpenVINO的开发环境的过程,大体步骤是系统安装,驱动安装,ROS、OpenVINO等软件安装。从实验结论来看,AIxBoard(爱克斯板)适合作为个人开发,及入门的边缘计算项目;相比其他边缘计算硬件在系统流畅性及兼容性上有较大优势,且因为cpu性能较出众,对于无法运行在GPU上的网络也有较大效率。
另一方面,介绍上主要接口与Jetson Nano(带GPU)载板兼容,但未开发相关驱动库,使用上还是较为繁琐。