OpenVINO C# API详解与演示
 openlab_4276841a
更新于 2年前
openlab_4276841a
更新于 2年前
作者:颜国进 英特尔边缘计算创新大使
OpenVINO™ 工具套件可以加快深度学习视觉应用开发速度,帮助用户在从边缘到云的各种英特尔平台上,更加方便快捷的将 AI 模型部署到生产系统中。本文的所介绍的 OpenVINO™ C# API 已支持 OpenVINO™ 2023.1.0 版。
C# 是由 C 和 C++ 衍生出来的一种安全的、稳定的、简单的、优雅的面向对象编程语言,它综合了 VB 简单的可视化操作和 C++ 的高运行效率,成为支持成为 .NET 开发的首选语言。作为人工智能开发人员,如果你希望在 C# 中使用 OpenVINO™ ,OpenVINO™ C# API 将是你的首选。OpenVINO™ C# API 提供了 NuGet 程序包,实现在 C# 中一站式安装与使用 OpenVINO™。
OpenVINO™ C# API 项目地址:https://github.com/guojin-yan/OpenVINO-CSharp-API
OpenVINO™ C# API 基于 OpenVINO™ C++ API 研发,下表展示了 C# 与 C++ API的对应关系:
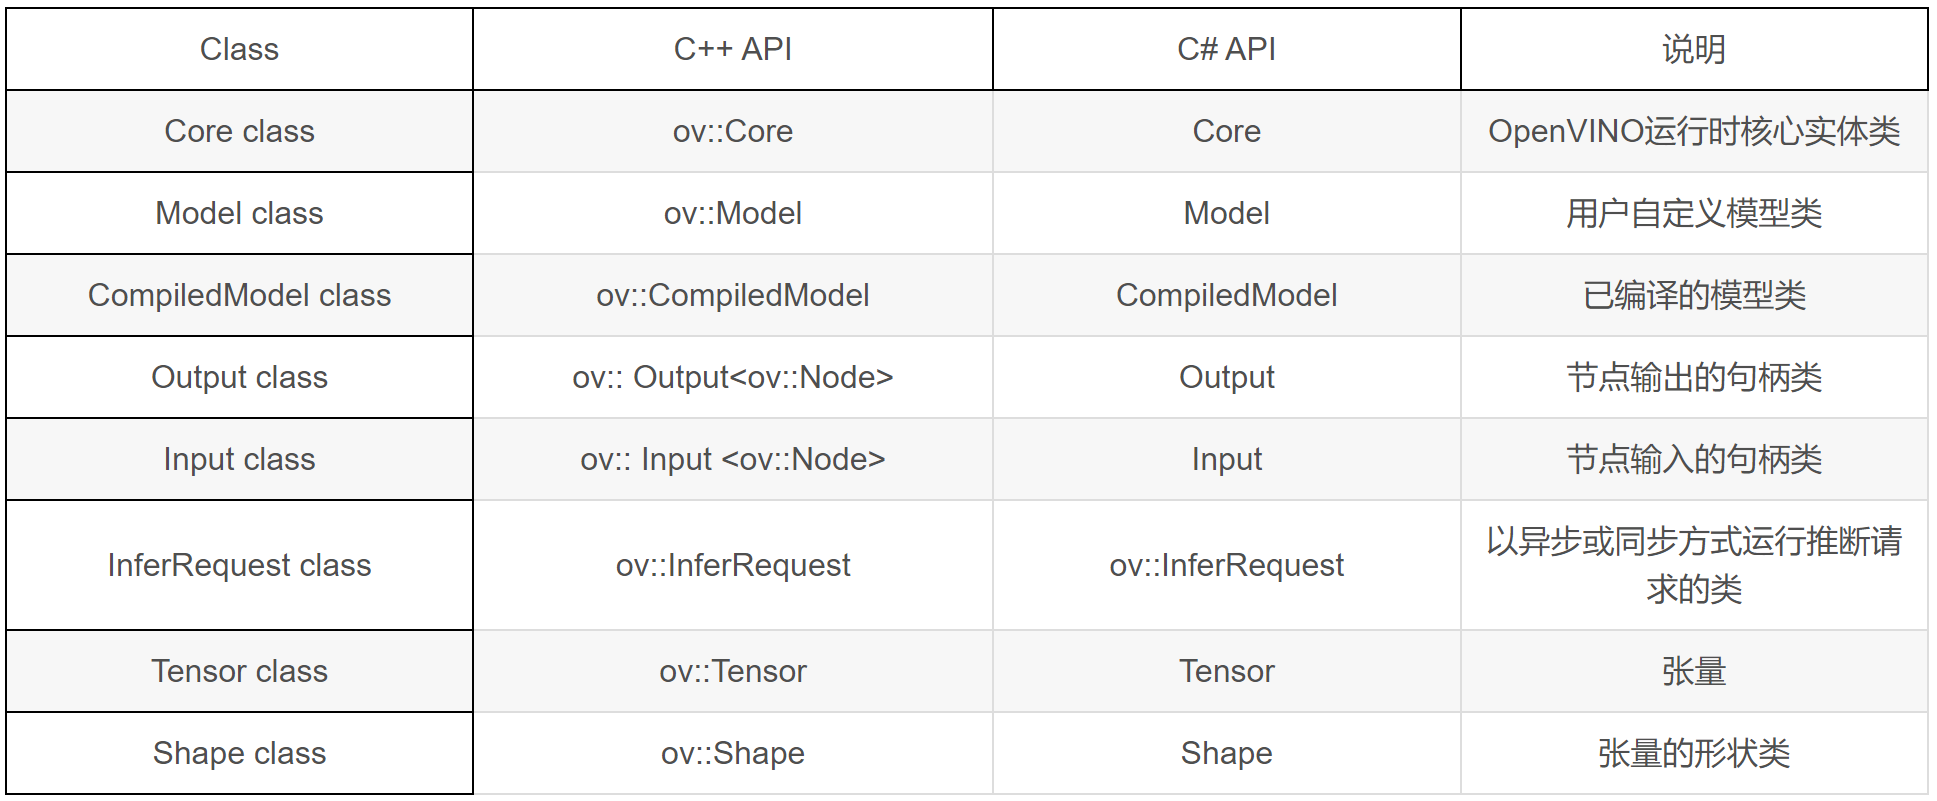
本文根据 AI 模型部署的典型步骤,演示 OpenVINO™ C# API 使用方式,并跟 C++ API 做对比。
1. 安装OpenVINO C# API
OpenVINO™ C# API 支持 NuGet 程序包安装方式,这与 OpenVINO™ C++ 库的安装过程相比,更加简单。如果使用 Visual Studio 开发 AI 项目,则可以通过 NuGet 程序包管理功能直接安装即可,如下图所示: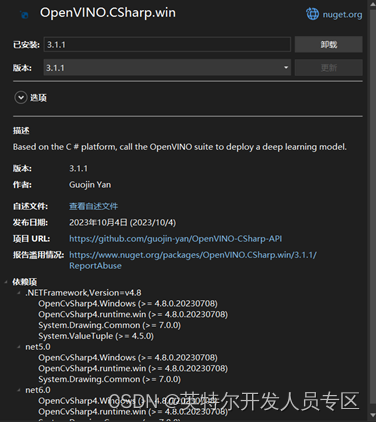
果通过 dotnet 命令方式安装,通过下面语句进行安装即可:
dotnet add package OpenVINO.CSharp.win2. 导入程序集
OpenVINO C# API 程序集全部在CSharp命名空间下,因此若要使用 OpenVINO C# API,需要先引入命名空间:using OpenVinoSharp;3. 初始化OpenVINO 运行时
Core 类代表一个 OpenVINO™ 运行时核心实体,后续的读取模型、加载模型等方法都需要通过 Core 类进行创建,在封装 C# API 时,为了与 C++ API 对应,也对 Core 类进行了封装,并封装了与 C++ API 中对应的方法。在 C# 中的初始化方式:
Core core = new Core();
在C++中的初始化方式:ov::Core core;
4. 加载并获取模型信息
4.1 加载模型
OpenVINO™ 2022.1 版本更新之后,加载模型是使用下面的 API 方法:
在C#中加载模型的方式:Model model = core.read_model(model_path);
在 C++ 中的初始化方式:std::shared_ptr
4.2 获取模型信息
通过 Core.read_model ()方法获得的 Model 对象和通过 Core.compile_model ()方法获得的 CompiledModel 对象,都支持直接访问属性获取输入与输出层信息。以Model对象获取模型信息为例,下面是所使用的 API 方法:
Input/Output 主要是封装了模型网络层,可以通过下面 API 实现获取模型的详细信息:
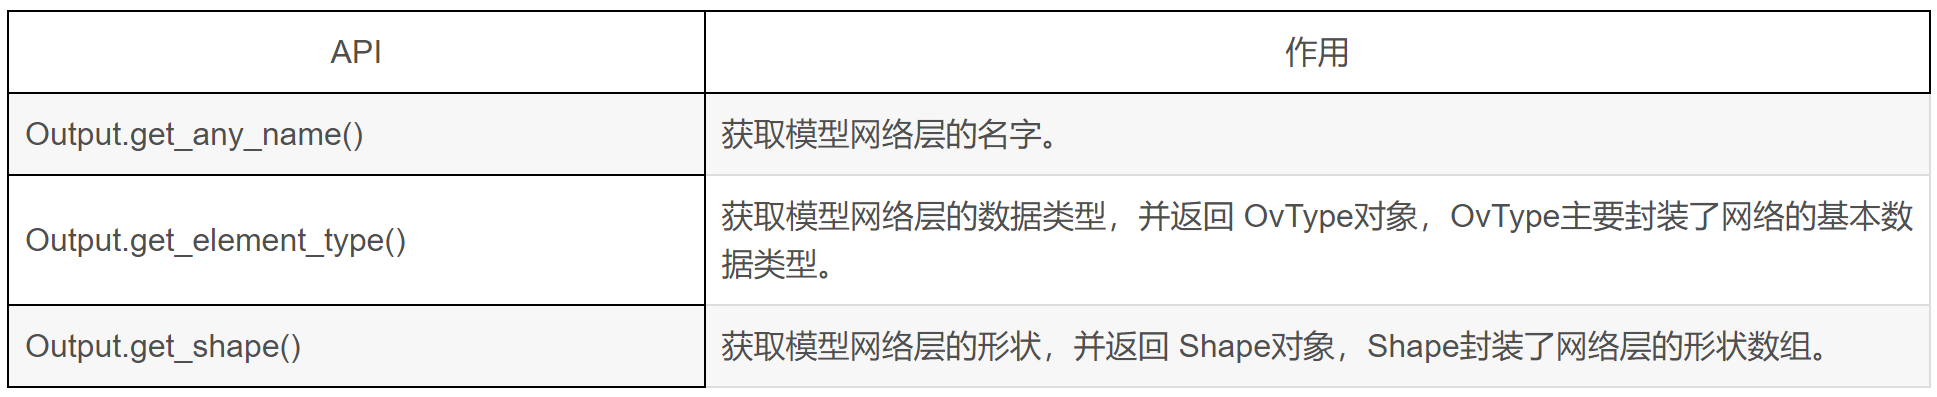
在 C# 中通过下方代码,可以直接获取模型的输入、输入层以及模型的 friendly name:
string model_name = model.get_friendly_name();
Input input = model.input();
Output output = model.output();
然后将模型具体信息打印到控制台页面:
Console.WriteLine("Model name: {0}", model_name);
Console.WriteLine("/------- [In] -------/");
Console.WriteLine("Input name: {0}", input.get_any_name());
Console.WriteLine("Input type: {0}", input.get_element_type().to_string());
Console.WriteLine("Input shape: {0}", input.get_shape().to_string());
Console.WriteLine("/------- [Out] -------/");
Console.WriteLine("Output name: {0}", output.get_any_name());
Console.WriteLine("Output type: {0}", output.get_element_type().to_string());
Console.WriteLine("Output shape: {0}", output.get_shape().to_string());
获取模型网络层信息如下:
Model name: torch_jit
/------- [In] -------/
Input name: data
Input type: float
Input shape: [1,3,224,224]
/------- [Out] -------/
Output name: prob
Output type: float
Output shape: [1,1000]
同样的输出信息,我们使用 C++ API 实现如下:
std::cout << "Model name: " << model->get_friendly_name() << std::endl;
ov::Output<ov::Node> input = model->input();
std::cout << "/------- [In] -------/" << std::endl;
std::cout << "Input name: " << input.get_any_name() << std::endl;
std::cout << "Input type: " << input.get_element_type().c_type_string() << std::endl;
std::cout << "Input shape: " << input.get_shape().to_string() << std::endl;
ov::Output<ov::Node> output = model->output();
std::cout << "/------- [Out] -------/" << std::endl;
std::cout << "Output name: " << output.get_any_name() << std::endl;
std::cout << "Output type: " << output.get_element_type().c_type_string() << std::endl;
std::cout << "Output shape: " << output.get_shape().to_string() << std::endl;
5. 编译模型并创建推理请求
在读取本地模型后,调用模型编译方法将模型编译为可以在目标设备上执行的 compile_model 对象,并通过该对象创建用于推断已编译模型的推断请求对象。下面是所使用的 API 方法:
在 C# 中编译模型并创建推理请求的方式:
CompiledModel compiled_model = core.compile_model(model, "AUTO");
InferRequest infer_request = compiled_model.create_infer_request();
使用 C++ API 中编译模型并创建推理请求的方式:
CompiledModel compiled_model = core.compile_model(model, "AUTO");
InferRequest infer_request = compiled_model.create_infer_request();
6. 张量Tensor
6.1 张量的获取与设置
在创建推理请求后,系统会自动创建和分配输入和输出的张量,张量可以通过 InferRequest 对象获得,并且可以自定义张量并加载到模型指定节点;可以根据张量的输入输出序号、名称以及模型节点 Node 对象获取和设置,主要 C# API 如下: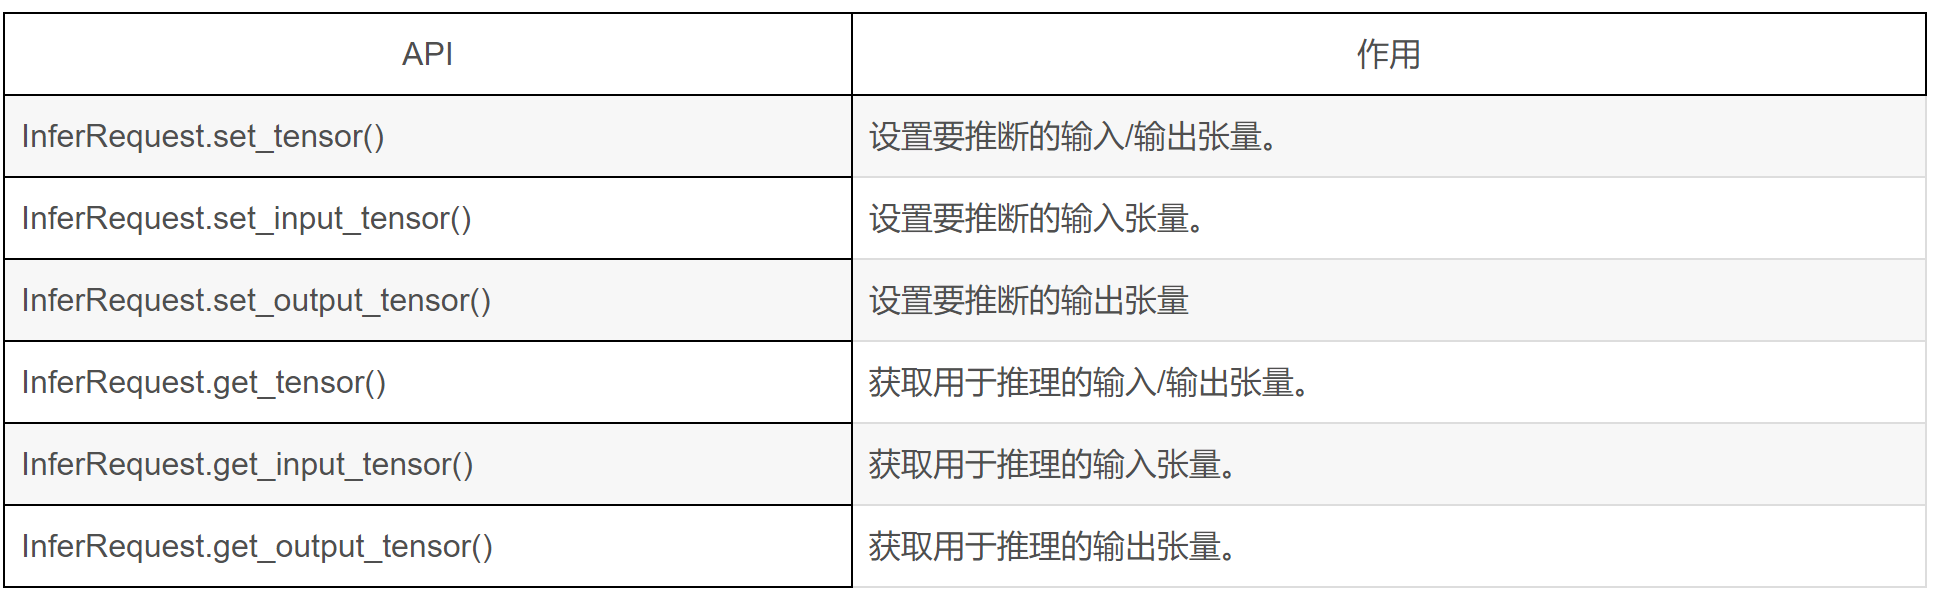
6.2 张量的信息获取与设置
张量中主要包含的信息有张量的形状 (Shape) 、张量的数据格式 (OvType-> element.Type) 以及张量中的内存数据。可以通过以下 API 方法操作张量的参数: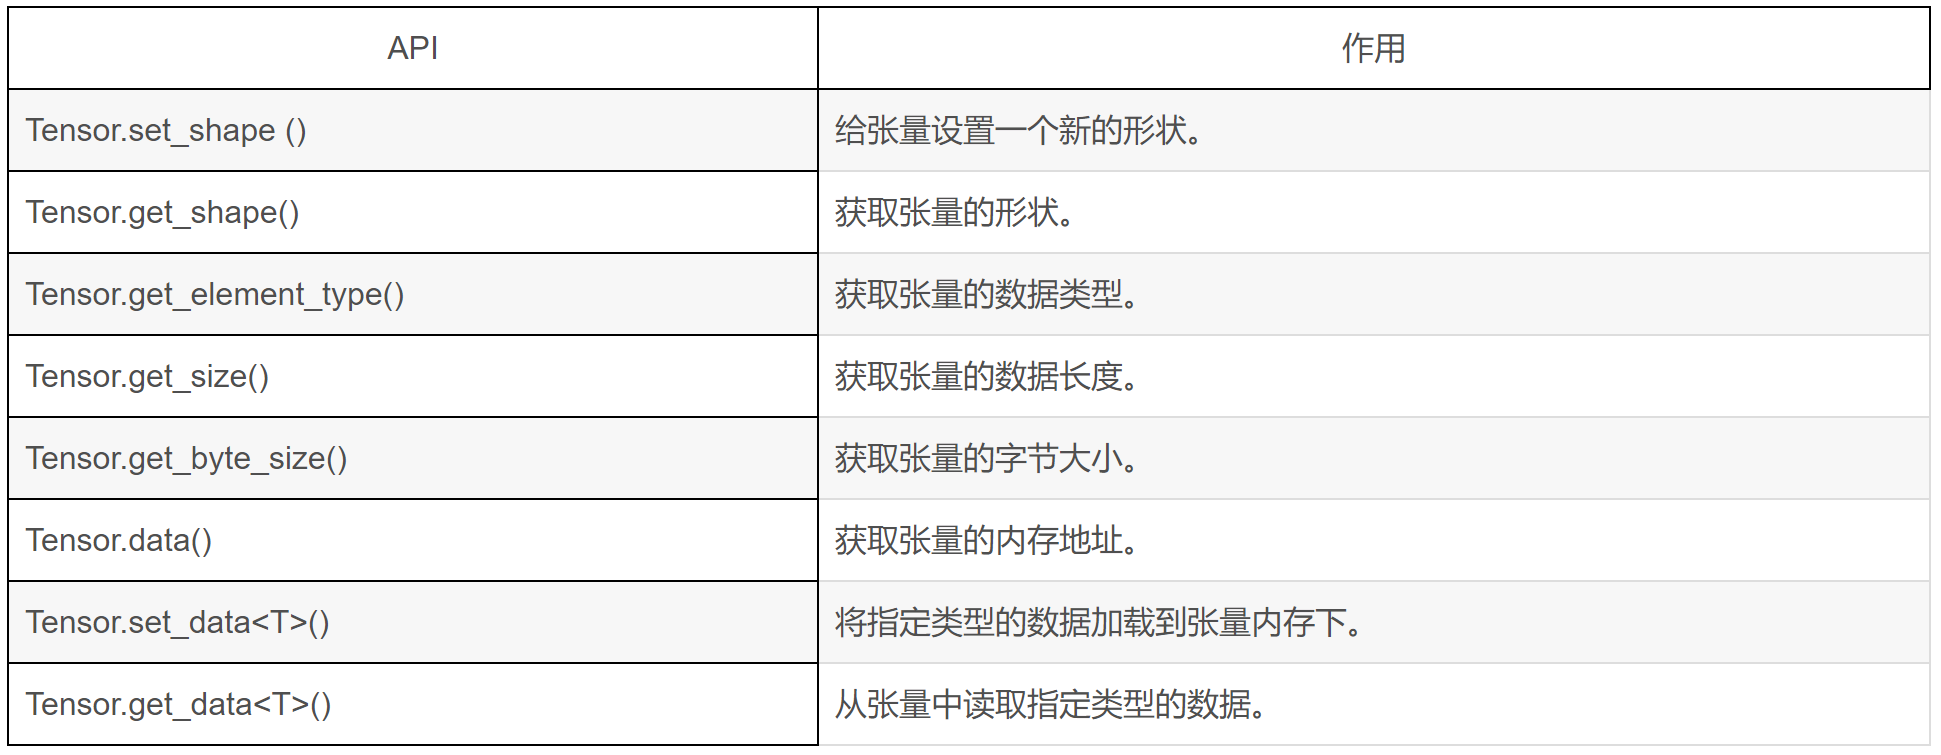
以上方法是对张量的一些基础操作,除了 set_data、get_data 是 OpenVINO™ C# API 独有的,其他接口都与 C++API 一致。
7. 加载推理数据
7.1 获取输入张量
对于单输入的模型可以直接通过 get_input_tensor() 方法获得,并调用 Tensor 的相关方法获取 Tensor 的相关信息,C# 代码如下所示:Tensor input_tensor = infer_request.get_input_tensor();
Console.WriteLine("/------- [Input tensor] -------/");
Console.WriteLine("Input tensor type: {0}", input_tensor.get_element_type().to_string());
Console.WriteLine("Input tensor shape: {0}", input_tensor.get_shape().to_string());
Console.WriteLine("Input tensor size: {0}", input_tensor.get_size()); 获取输出结果为:
/------- [Input tensor] -------/
Input tensor type: f32
Input tensor shape: Shape : {1, 3, 224, 224}
Input tensor size: 150528 对于上述的同样输出内容,我们也可以通过 C++ API 实现,C++ 代码如下:
ov::Tensor input_tensor = infer_request.get_input_tensor();
std::cout << "/------- [Input tensor] -------/" << std::endl;
std::cout << "Input tensor type: " << input_tensor.get_element_type().c_type_string() << std::endl;
std::cout << "Input tensor shape: " << input_tensor.get_shape().to_string() << std::endl;
std::cout << "Input tensor size: " << input_tensor.get_size() << std::endl; 7.2 添加推理数据
这一步主要是将处理好的图片数据加载到 Tensor 数据内存中, OpenVINO™ 的 API 中提供了访问内存地址的接口,可以获取数据内存首地址,不过为了更好的加载推理数据,我们此处封装了 set_data<T>() 方法,可以实现将处理后的图片数据加载到数据内存上。在 C# 中的代码为:Mat input_mat = new Mat();
Shape input_shape = input_tensor.get_shape();
long channels = input_shape[1];
long height = input_shape[2];
long width = input_shape[3];
float[] input_data = new float[channels * height * width];
Marshal.Copy(input_mat.Ptr(0), input_data, 0, input_data.Length);
input_tensor.set_data(input_data); 下面是在 C++ 中实现上述功能的代码:
tcv::Mat input_mat;
float* input_data = input_tensor.data<float>();
ov::Shape input_shape = input_tensor.get_shape();
size_t channels = input_shape[1];
size_t height = input_shape[2];
size_t width = input_shape[3];
for (size_t c = 0; c < channels; ++c) {
for (size_t h = 0; h < height; ++h) {
for (size_t w = 0; w < width; ++w) {
input_data[c * height * width + h * width + w] = input_mat.at<cv::Vec<float, 3>>(h, w)[c];
}
}
} 8. 模型推理
在加载完推理数据后,就可以调用模型推理的 API 方法推理当前数据,主要使用到的 API 方法为:
调用该方法也较为简单,只需要调用该 API 接口即可,在 C# 中的代码为:
infer_request.infer();C++ 中的代码与 C#中一致。
9. 获取推理结果
对于单输出的模型可以直接通过 get_output_tensor() 方法获得,并调用 Tensor 的相关方法获取 Tensor 的相关信息,C# 代码如下所示:Tensor output_tensor = infer_request.get_output_tensor();
Console.WriteLine("/------- [Output tensor] -------/");
Console.WriteLine("Output tensor type: {0}", output_tensor.get_element_type().to_string());
Console.WriteLine("Output tensor shape: {0}", output_tensor.get_shape().to_string());
Console.WriteLine("Output tensor size: {0}", output_tensor.get_size()); 获取输出 output_tensor 信息为:
/------- [Output tensor] -------/
Output tensor type: f32
Output tensor shape: Shape : {1, 1000}
Output tensor size: 1000 对于输出 Tensor,我们只需要读取输出内存上的数据即可,此处我们封装了 get_data<T>() 方法,可以直接获取输出内存上的数据,在 C# 中的代码为:float[] result = output_tensor.get_data
同样获取推理结果,在 C++ 中的代码为:
const float* output_data = output_tensor.data<const float>();
float result[1000];
for (int i = 0; i < 1000; ++i) {
result[i] = *output_data;
output_data++;
} 在获取结果后,后续的处理需要根据模型的输出类型做相应的处理。
10. 释放分配的内存
由于 C# 在封装时采用的 C API 接口实现的,因此在 C# 中会产生较多的非托管内存,若该对象出现循环重复创建,会导致过多的内存未释放导致内存泄漏,因此对于临时创建的对象在使用后要即使销毁,销毁方式也较为简单,只需要调用对象的 dispose() 方法即可。output_tensor.dispose();
input_shape.dispose();
infer_request.dispose();
compiled_model.dispose();
input.dispose();
output.dispose();
model.dispose();
core.dispose(); 11. Yolov8 分类模型示例
下面代码展示了 Yolov8 分类模型使用 OpenVINO™ C# API API 方法部署模型的完整代码:using OpenCvSharp;
using OpenCvSharp.Dnn;
using OpenVinoSharp;
using System.Data;
using System.Runtime.InteropServices;
namespace test_openvino_csharp_api
{
internal class Program
{
static void Main(string[] args)
{
string model_path = "E:\\GitSpace\\ OpenVINO-CSharp-API \\model\\yolov8\\yolov8s-cls.xml";
Core core = new Core(); // 初始化推理核心
Model model = core.read_model(model_path); // 读取本地模型
CompiledModel compiled_model = core.compile_model(model, "AUTO"); // 便哟模型到指定设备
// 获取模型的输入输出信息
Console.WriteLine("Model name: {0}", model.get_friendly_name());
Input input = compiled_model.input();
Console.WriteLine("/------- [In] -------/");
Console.WriteLine("Input name: {0}", input.get_any_name());
Console.WriteLine("Input type: {0}", input.get_element_type().to_string());
Console.WriteLine("Input shape: {0}", input.get_shape().to_string());
Output output = compiled_model.output();
Console.WriteLine("/------- [Out] -------/");
Console.WriteLine("Output name: {0}", output.get_any_name());
Console.WriteLine("Output type: {0}", output.get_element_type().to_string());
Console.WriteLine("Output shape: {0}", output.get_shape().to_string());
// 创建推理请求
InferRequest infer_request = compiled_model.create_infer_request();
// 获取输入张量
Tensor input_tensor = infer_request.get_input_tensor();
Console.WriteLine("/------- [Input tensor] -------/");
Console.WriteLine("Input tensor type: {0}", input_tensor.get_element_type().to_string());
Console.WriteLine("Input tensor shape: {0}", input_tensor.get_shape().to_string());
Console.WriteLine("Input tensor size: {0}", input_tensor.get_size());
// 读取并处理输入数据
Mat image = Cv2.ImRead(@"E:\GitSpace\ OpenVINO-CSharp-API \dataset\image\demo_7.jpg");
Mat input_mat = new Mat();
input_mat = CvDnn.BlobFromImage(image, 1.0 / 255.0, new Size(224, 224), 0, true, false);
// 加载推理数据
Shape input_shape = input_tensor.get_shape();
long channels = input_shape[1];
long height = input_shape[2];
long width = input_shape[3];
float[] input_data = new float[channels * height * width];
Marshal.Copy(input_mat.Ptr(0), input_data, 0, input_data.Length);
input_tensor.set_data(input_data);
// 模型推理
infer_request.infer();
// 获取输出张量
Tensor output_tensor = infer_request.get_output_tensor();
Console.WriteLine("/------- [Output tensor] -------/");
Console.WriteLine("Output tensor type: {0}", output_tensor.get_element_type().to_string());
Console.WriteLine("Output tensor shape: {0}", output_tensor.get_shape().to_string());
Console.WriteLine("Output tensor size: {0}", output_tensor.get_size());
// 获取输出数据
float[] result = output_tensor.get_data<float>(1000);
List<float[]> new_list = new List<float[]> { };
for (int i = 0; i < result.Length; i++)
{
new_list.Add(new float[] { (float)result[i], i });
}
new_list.Sort((a, b) => b[0].CompareTo(a[0]));
KeyValuePair<int, float>[] cls = new KeyValuePair<int, float>[10];
for (int i = 0; i < 10; ++i)
{
cls[i] = new KeyValuePair<int, float>((int)new_list[i][1], new_list[i][0]);
}
Console.WriteLine("\n Classification Top 10 result : \n");
Console.WriteLine("classid probability");
Console.WriteLine("------- -----------");
for (int i = 0; i < 10; ++i)
{
Console.WriteLine("{0} {1}", cls[i].Key.ToString("0"), cls[i].Value.ToString("0.000000"));
}
// 销毁非托管内存
output_tensor.dispose();
input_shape.dispose();
infer_request.dispose();
compiled_model.dispose();
input.dispose();
output.dispose();
model.dispose();
core.dispose();
}
}
} 12. 总结
在本文中我们基于模型推理流程,演示了 OpenVINO™ C# API 使用方法,并和 OpenVINO™ C++API 进行了对比,展示了 OpenVINO™ C# API 与 C++API 在使用的区别,这也对使用过 C++ API 的开发者十分友好,上手会十分容易。在本文中我们只展示了基础的模型推理流程代码,也对各个 API 进行了测试,针对其他比较高级的 API 方法,我们后续会继续进行测试其他 API 方法,向各位开发者展示其用法。
总的来说,目前 OpenVINO™ C# API 已经完全支持在 Windows 环境下的安装使用,欢迎各位开发者安装使用,如有相关问题或优化方法,也欢迎大家提出意见与指导。