OpenVINO™基于人脸landmark检测实现眼睛疲劳/睡意检测
 openlab_4276841a
更新于 5年前
openlab_4276841a
更新于 5年前
人脸landmark介绍
人脸landmark在人脸对齐、人脸重建、身份鉴别、人脸编辑与人脸AR等方面都有重要作用,但是什么是人脸landmark,首先看一张图:
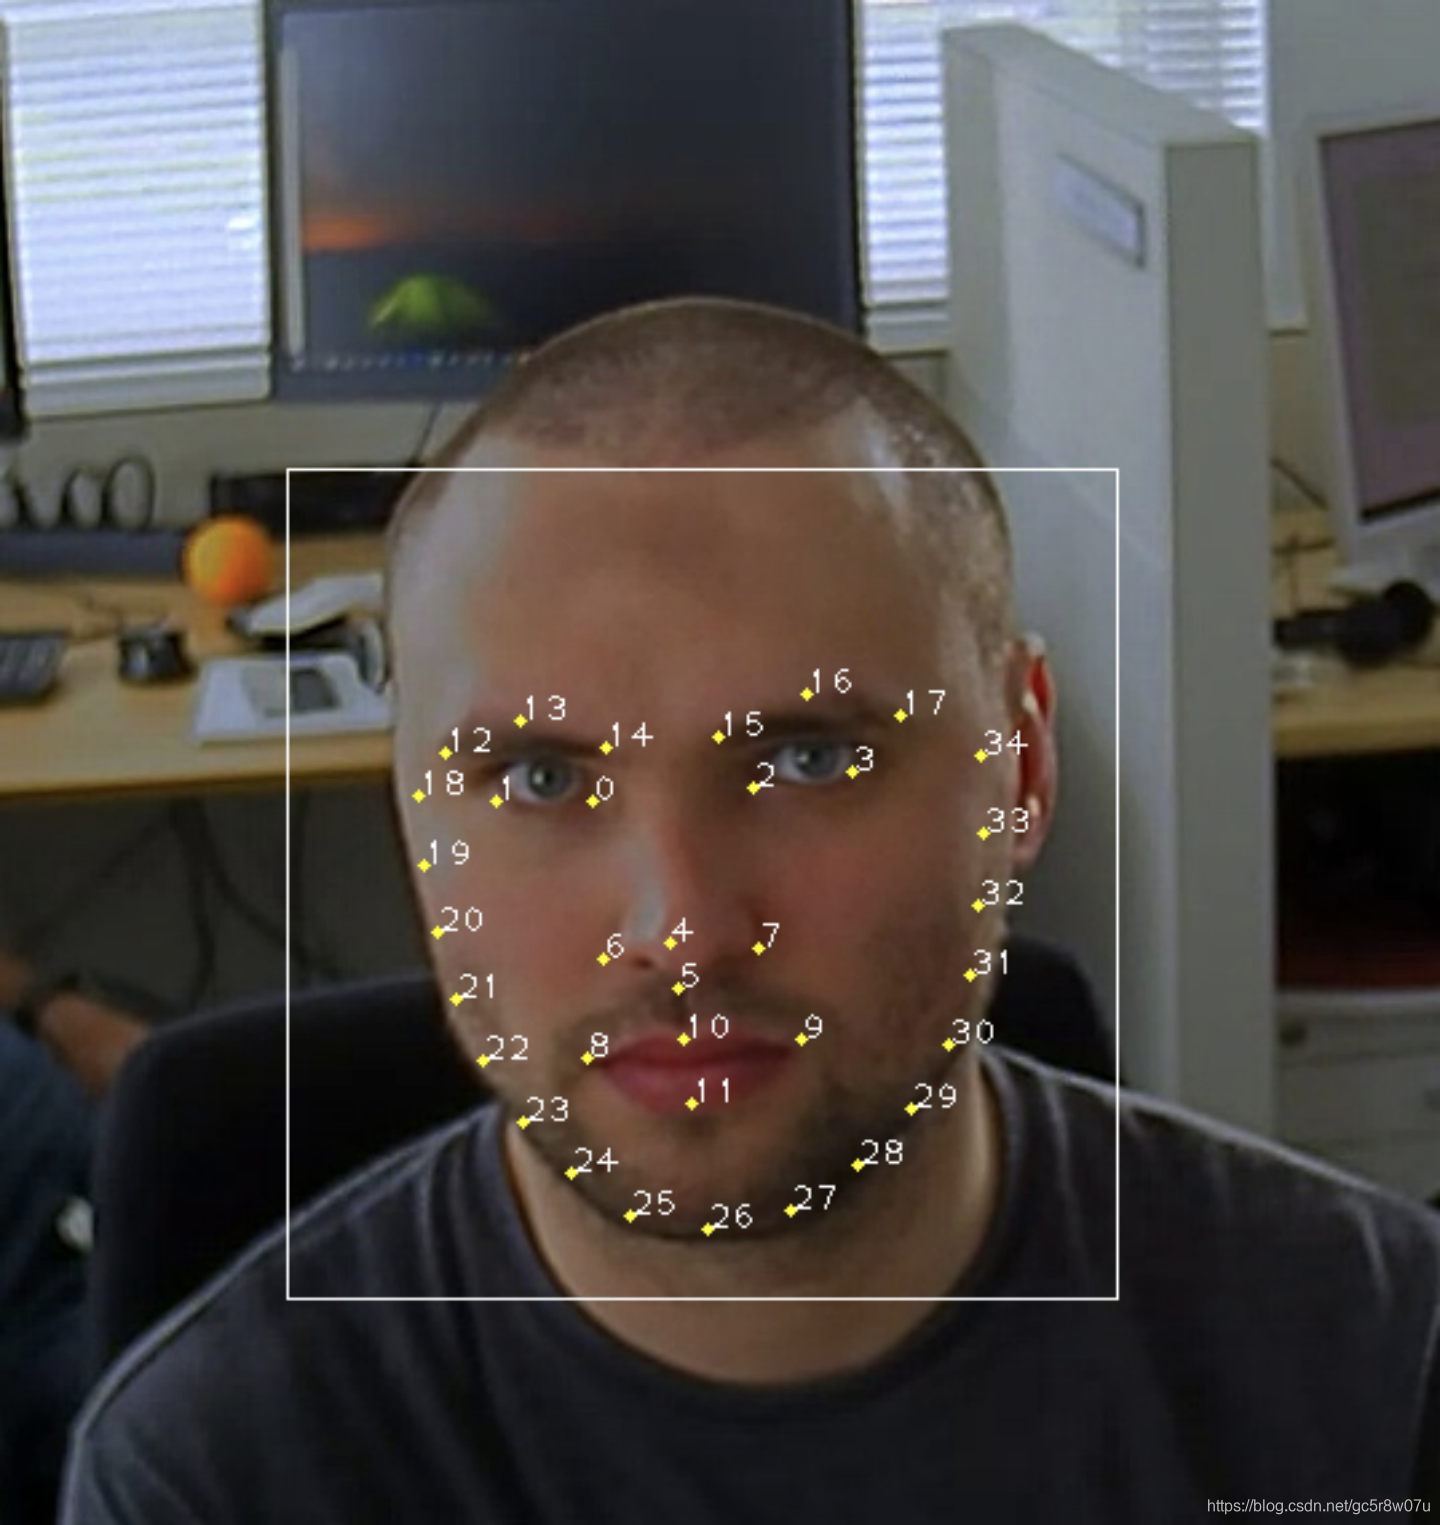
上图在检测人脸白色矩形框的基础上,通过OpenVINO™自带的人脸landmark模型实现了对人脸区域关键部位35个点位的标记,它就是典型的人脸landmark提取。在深度学习没有那么流行之前,传统的人脸landmark提取有两个让人吐槽的痛点:
1.人脸的landmark中128个点位与68个点位提取是高耗时操作
2.人脸landmark提取算法的抗干扰能力与普适性很差
自从深度学习方式在计算机视觉领域大显身手之后,人脸landmark算法通过卷积神经网络实现了稳定性与精准度双提升,现在已经是很多应用标配中间步骤。根据提取的人脸landmark点数的不同,最常见分为:
5点提取最简单人脸对齐
35点提取常见人脸对齐、人脸比对、人脸AR
68点提取场景适用人脸对齐、人脸比对、人脸AR等
128点提取场景适用人脸对齐、人脸比对、人脸AR等
192点提取,场景适用人脸对齐、人脸比对、人脸AR、人脸3D重建
更多点位的人脸landmark提取这里就不再列出了。
300W是人脸landmark提取最常用的一个基准数据集,支持68个点位与51个点位的人脸landmark数据标注与训练。其中68个点位的landmark人脸标注位置信息如下: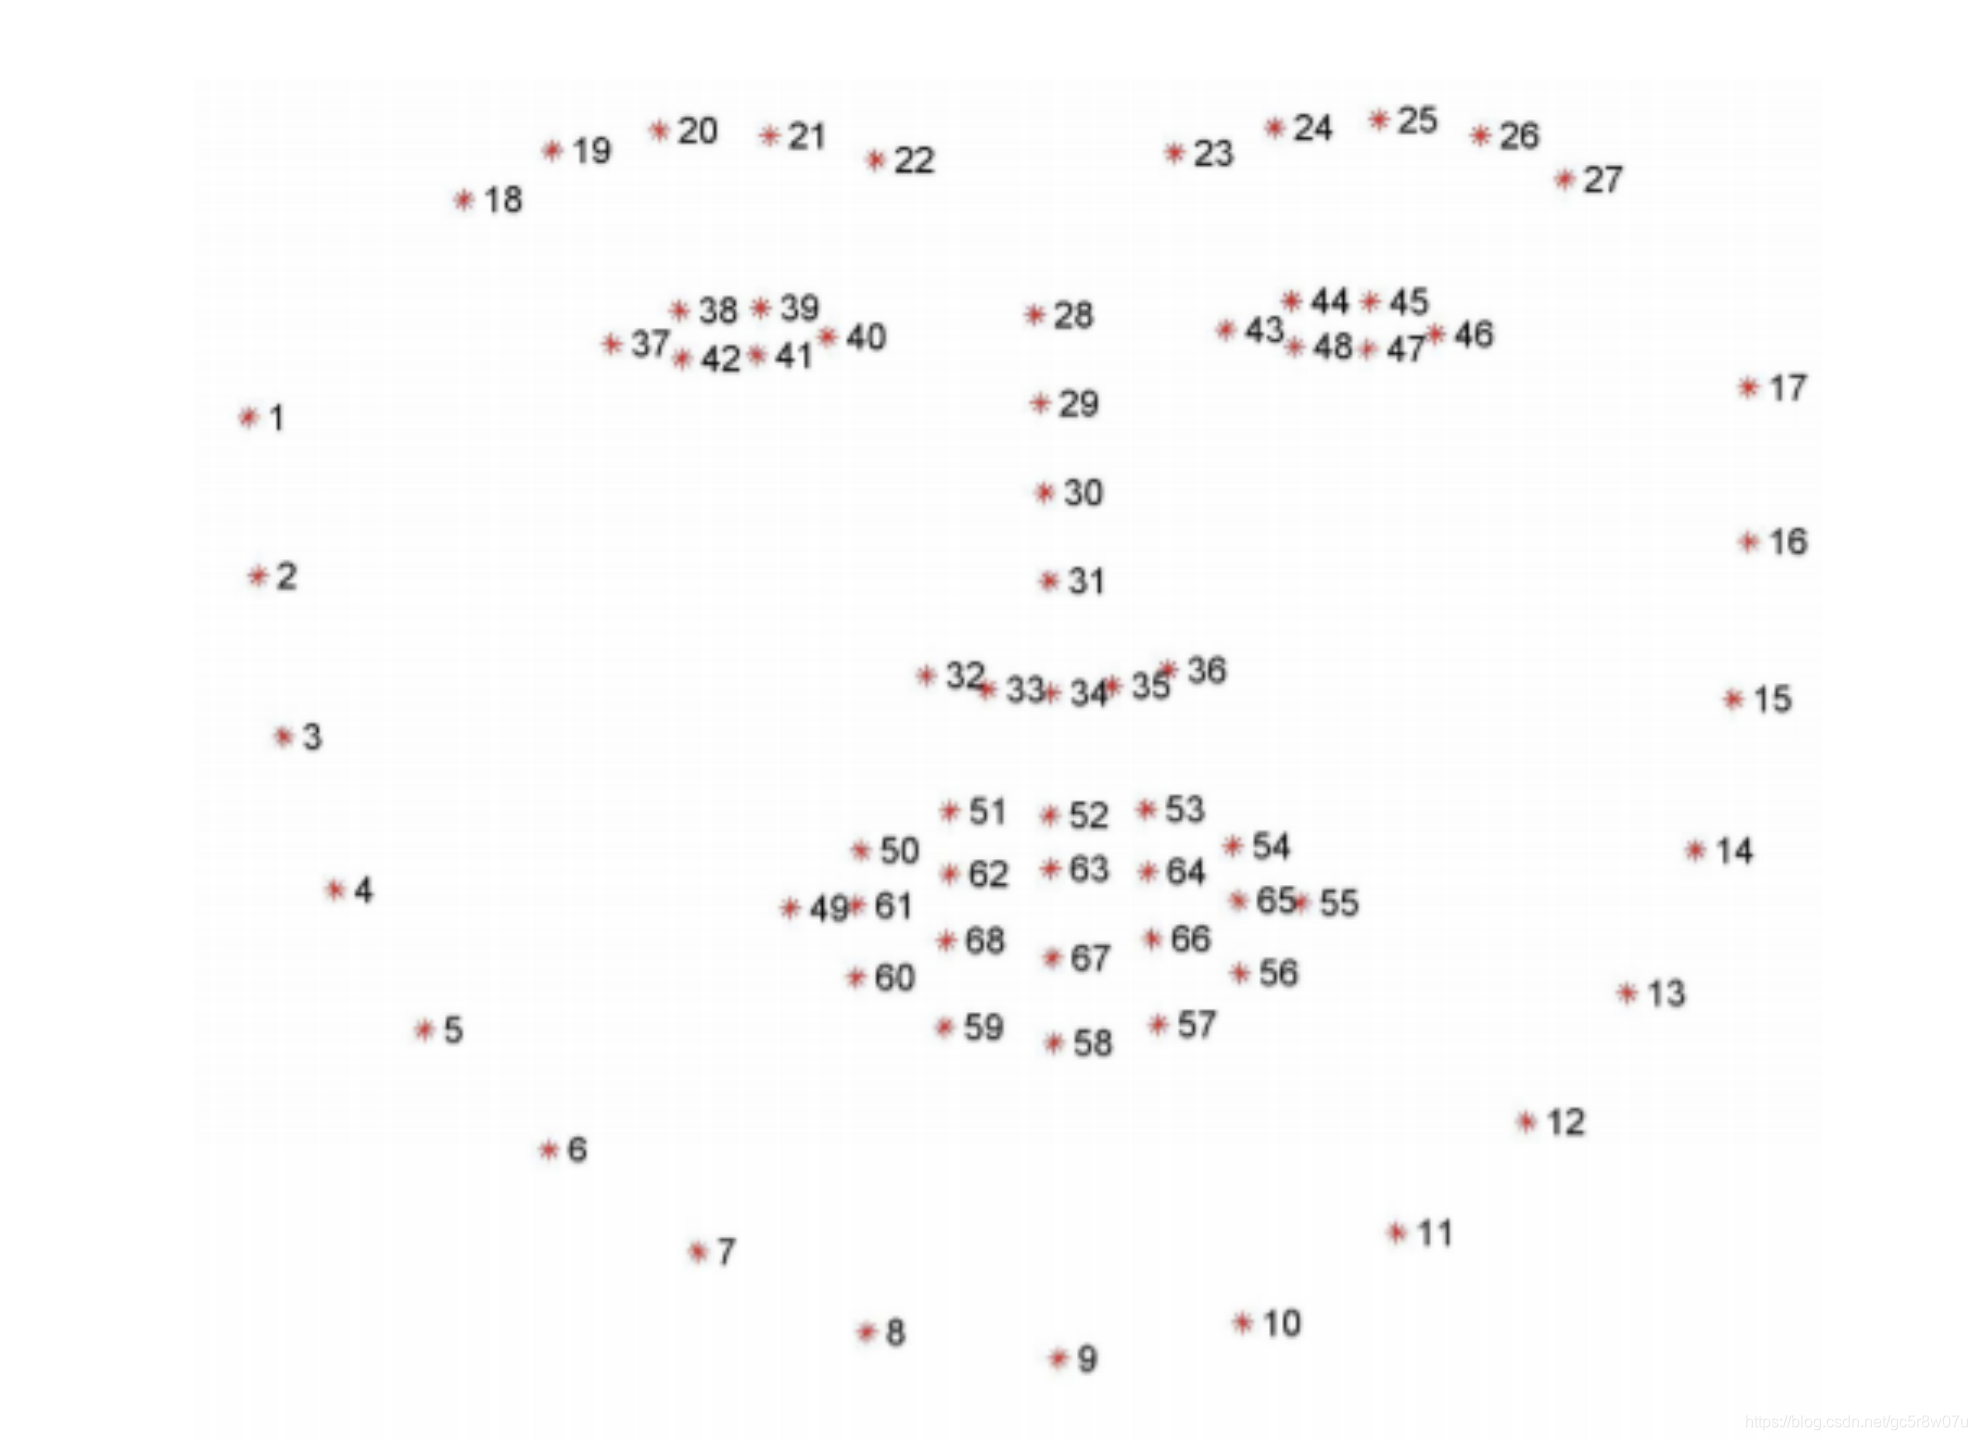
人脸landmark实现疲劳检测基本原理
我们首先使用人脸检测模型,检测得到人脸ROI区域,然后使用一个人脸landmark预测模型得到人脸区域的68个点位,其中对我们最有用的是分别来自图-2中的左右眼睛周围的38、39、41、42与44、45、47、48八个点位。人的疲劳最明显的特征之一就是会闭上眼睛,要打瞌睡,我们通过上述八个点来求解,它们的横纵比就可以度量眼睛的闭合程度,辅助一个阈值就可以很好过滤,达到根据眼睛的闭合程度实现睡意/疲劳检测的目的。手绘了一个示意图如下: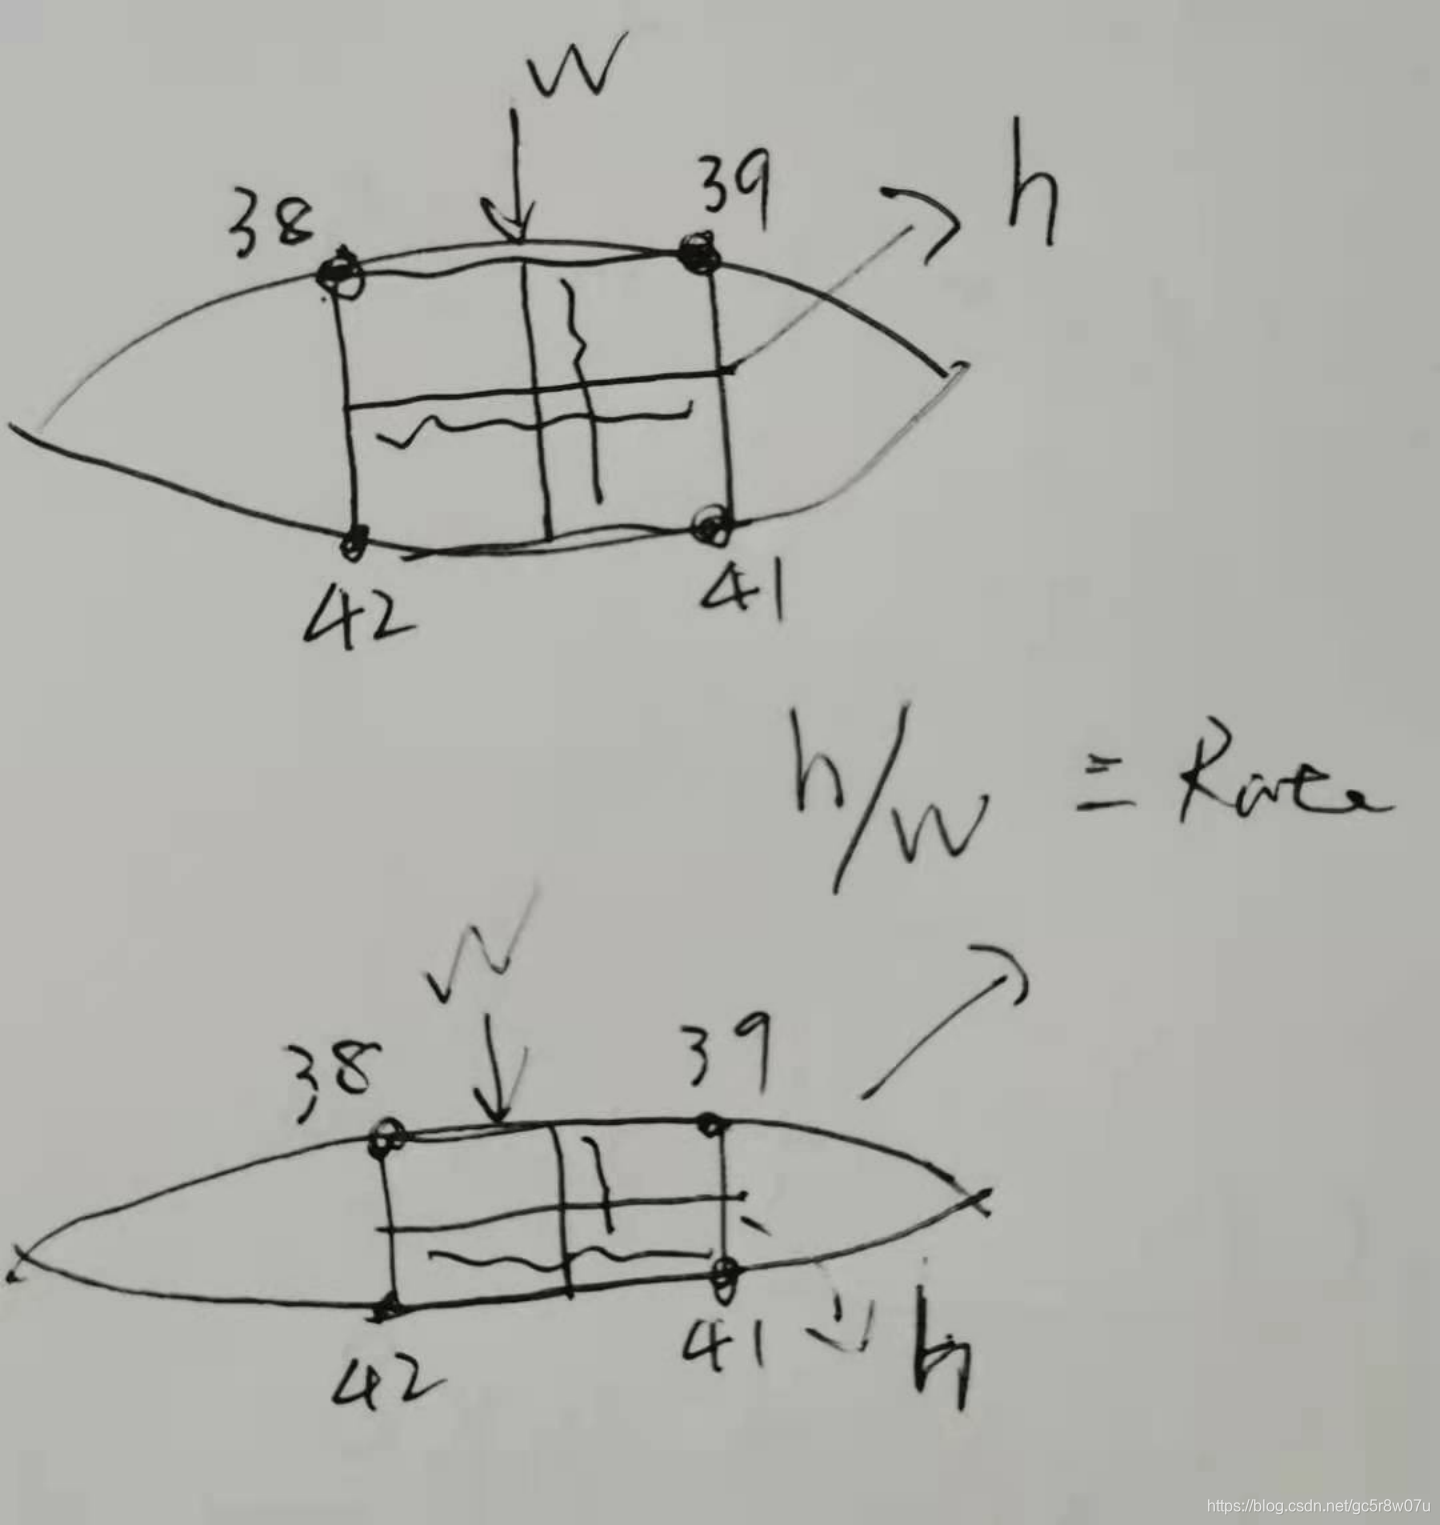
网络模型
OpenVINO™中有两个自带的landmark预测模型,分别支持5点与35点定位,不符合我们期望的68个点定位的landmark模型预测。所以这里使用Github上一个开源的基于Pytorch版本实现的68个点位预测模型,它支持OpenVINO™加速,工程地址如下:
https://github.com/github-luffy/PFLD_68points_Pytorch我git clone了上述的工程地址,然后通过下面的脚本把其中mobilenetv2的PFLD的预训练模型转换为OpenVINO™可以正确读取与解析的ONNX格式,转换脚本如下:
model = torch.load("D:/projects/PFLD_68points_Pytorch-master/pretrained_model/mobileNetV2_1.0.pth")
model.cpu()
model.eval()
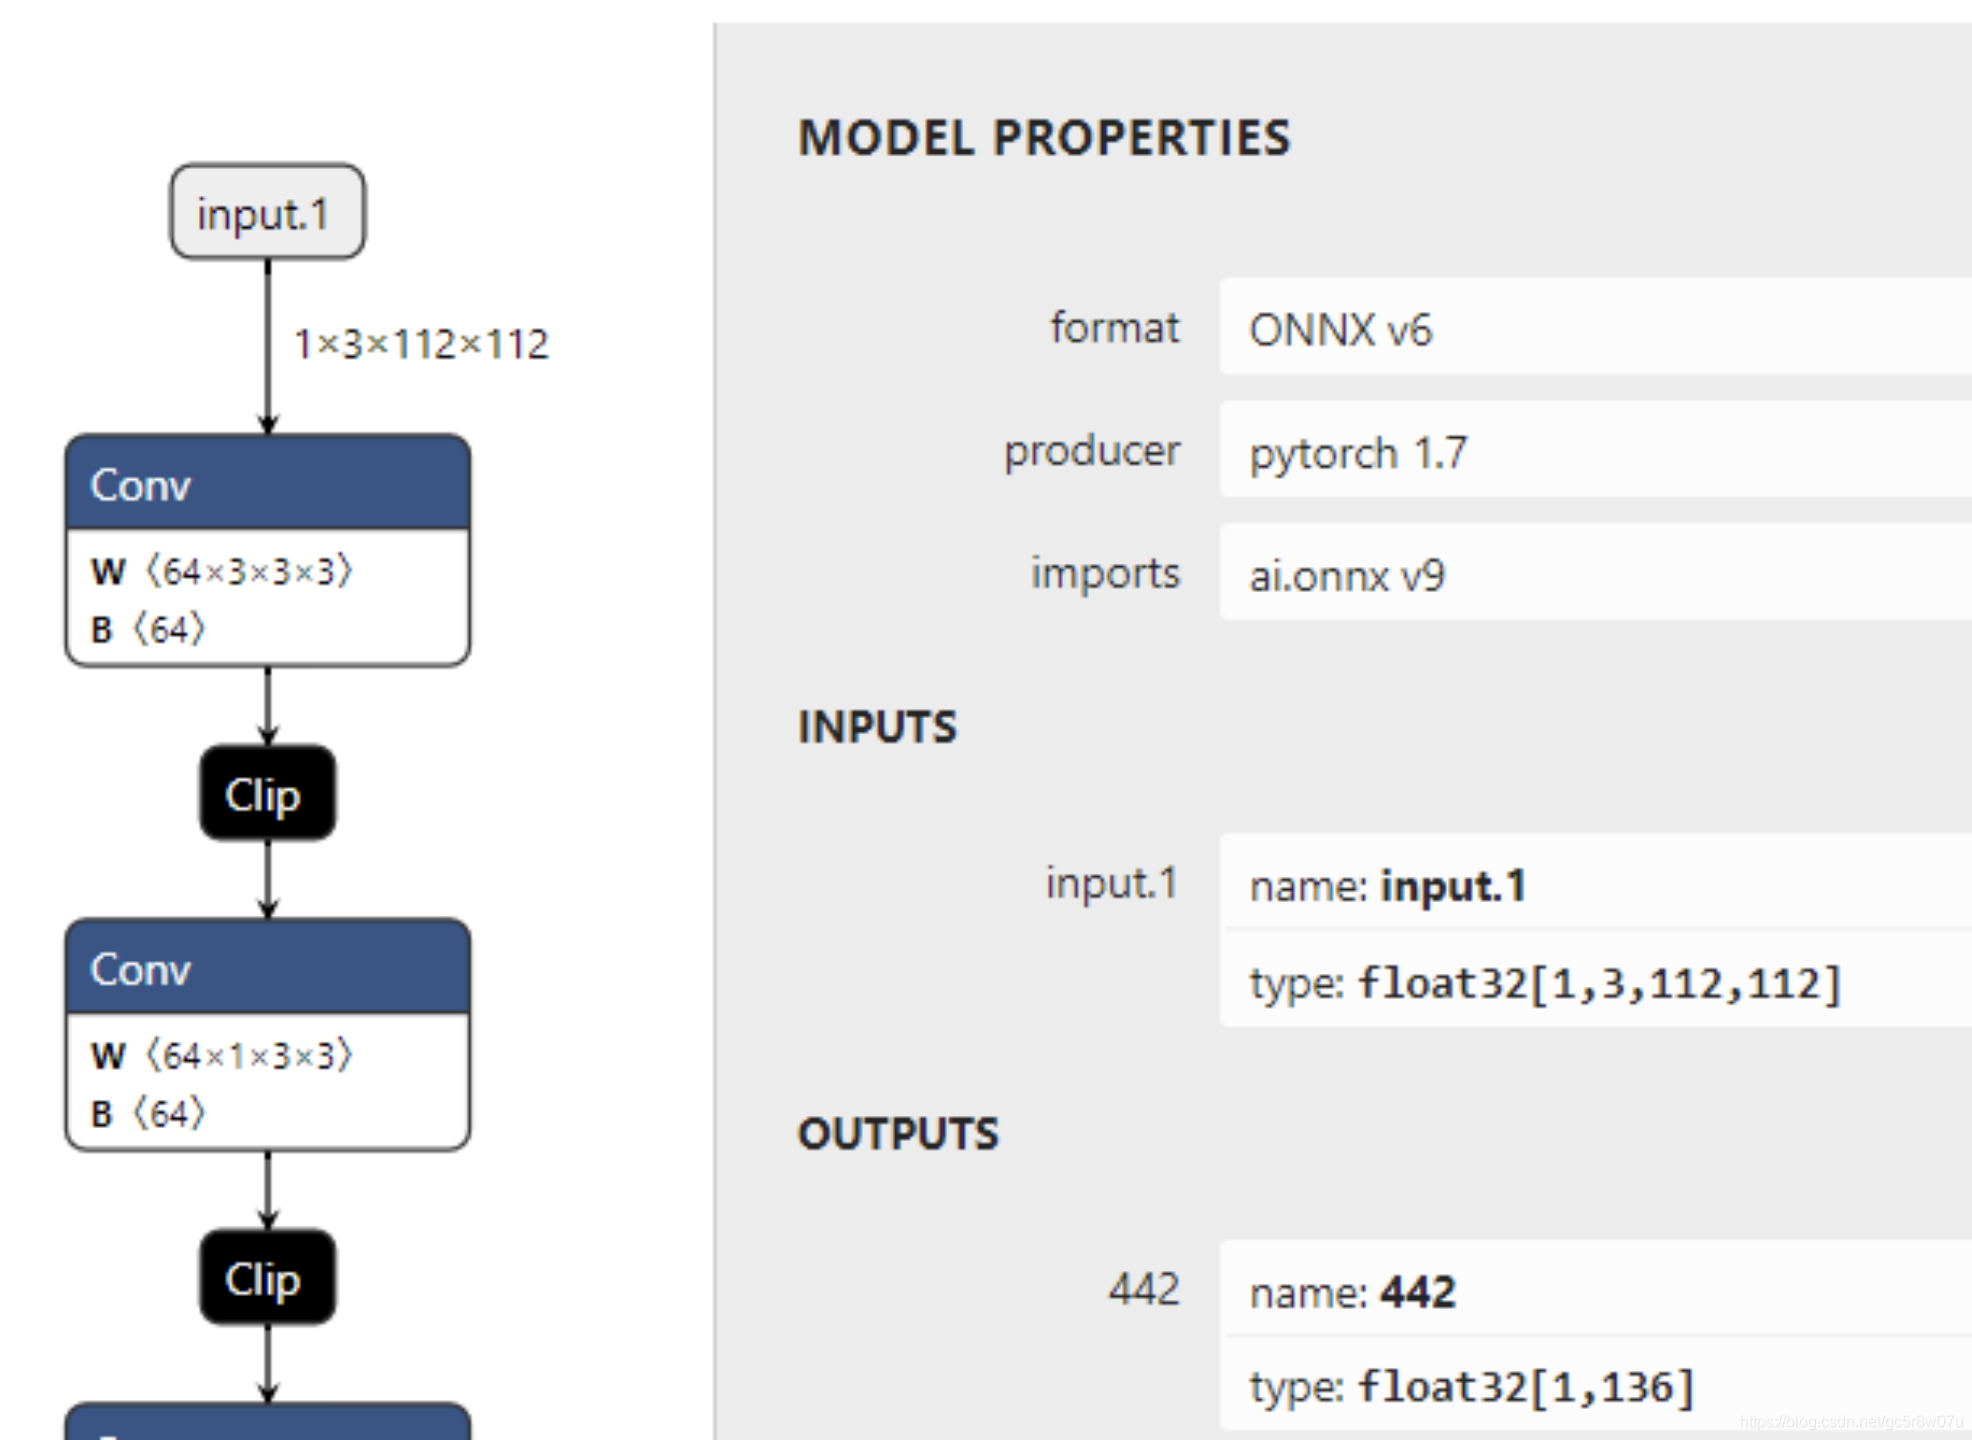
dummy_input1 = torch.randn(1, 3, 112, 112, dtype=torch.float)
torch.onnx.export(model, (dummy_input1), "mobilenetv2_pfld.onnx", verbose=True)可视化的模型输入与输出结构如下:
代码实现与运行演示
在代码实现与运行演示环节,参考之前的对象检测部分,我们可以实现人脸检测,然后从人脸检测输出中得到人脸的ROI区域,这部分的代码实现在前面的文章中已经详细分享过,这里就不再赘述,我们把代码实现主要放在如何提取landmark的68个点位预测与眼睛疲劳检测部分,这部分的代码实现主要分为以下几个部分:**Step1:**加载人脸landmark网络,设置输入与输出:
std::string onnx = "D:/mobilenetv2_pfld.onnx";
InferenceEngine::CNNNetwork network = ie.ReadNetwork(onnx);
InferenceEngine::InputsDataMap inputs = network.getInputsInfo();
InferenceEngine::OutputsDataMap outputs = network.getOutputsInfo();

for (auto item : input******r>	land_input_name = item.first;
	auto input_data = item.second;
	input_data->setPrecision(Precision::FP32);
	input_data->setLayout(Layout::NCHW);
}

for (auto item : output******r>	land_output_name = item.first;
	auto output_data = item.second;
	output_data->setPrecision(Precision::FP32);
}

auto executable_network = ie.LoadNetwork(network, "CPU");
landmark_request = executable_network.CreateInferRequest();
**Step2:**提取人脸ROI区域,并实现输入预处理!
这里有个很trick的地方就是图像的预处理,因为引用的模型来自公开训练的生成,模型在训练时候预处理方式是在推理必须要保持一致处理的,从模型示例代码中我发现它的预处理方式主要包括转换为0~1之间的浮点数数值,这部分的代码实现如下:
cv::Rect box;
int w = static_cast<int>(x2 - x1);
int h = static_cast<int>(y2 - y1);

int size = static_cast<int>(std::max<float>(w, h)*1.1f);
int cx = x1 + w / 2;
int cy = y1 + h / 2;
x1 = cx - size / 2;
x2 = x1 + size;
y1 = cy - size / 2;
y2 = y1 + size;

x1 = std::max(0.0f, x1);
y1 = std::max(0.0f, y1);

x2 = std::min(static_cast<float>(im_w), x2);
y2 = std::min(static_cast<float>(im_h), y2);

box.x = static_cast<int>(x1);
box.y = static_cast<int>(y1);
box.width = static_cast<int>(x2 - x1);
box.height = static_cast<int>(y2 - y1);
cv::Mat face_roi = curr_frame(box);
cv::Mat rgb_roi;
cv::cvtColor(face_roi, rgb_roi, cv::COLOR_BGR2RGB);
face_roi.convertTo(face_roi, CV_32F);
face_roi = face_roi / 256.0;
设置图像数据并推理
auto face_input_blob = landmark_request.GetBlob(land_input_name);
matU8ToBlob2<float>(face_roi, face_input_blob);
landmark_request.Infer();
这里有个需要注意的地方,输入的输入本身是浮点数据,OpenVINO™自带Sample代码中的函数只支持字节图像数据输入,所以需要修改一下该方法来支持浮点数图像数据输入,修改以后我重命名位matU8ToBlob2。
**Step3:**解析预测68个定位点并计算眼睛四个点的横纵比
这里我只计算一只眼睛每帧的数据,根据数据统计发现,当比率小于0.35左右时,有眼睛闭合的趋势,可以认为是眼睛疲劳的生物特征表现。这部分的代码实现如下:
auto land_output = landmark_request.GetBlob(land_output_name);
const float* blob_out = static_cast<PrecisionTrait<Precision::FP32>::value_type*>(land_output->buffer());
const SizeVectorland_dims = land_output->getTensorDesc().getDim******r>const int b = land_dims[0];
const int cc = land_dims[1];
int index = 0;
std::vector<cv::Point2f>eye_pt****r>for (int i = 0; i< cc; i += 2) {
float x = blob_out[i] * box.width + box.x;
float y = blob_out[i + 1] * box.height + box.y;
cv::circle(curr_frame, cv::Point(x, y), 1, cv::Scalar(255, 0, 0), 1, 8, 0);
if (index == 37 || index == 38 || index == 40 || index == 41) {
eye_pts.push_back(cv::Point2f(x, y));
cv::circle(curr_frame, cv::Point(x, y), 1, cv::Scalar(0, 0, 255), 1, 8, 0);
}
if (index == 43 || index == 44 || index == 46 || index == 47) {
eye_pts.push_back(cv::Point2f(x, y));
cv::circle(curr_frame, cv::Point(x, y), 1, cv::Scalar(0, 0, 255), 1, 8, 0);
}
index++;
}
float e1_x = (eye_pts[0].x + eye_pts[1].x) / 2;
float e1_y = (eye_pts[0].y + eye_pts[1].y) / 2;
float e2_x = (eye_pts[2].x + eye_pts[3].x) / 2;
float e2_y = (eye_pts[2].y + eye_pts[3].y) / 2;
floatdist_w = std::sqrt(std::pow(e1_x - e2_x, 2) + std::pow(e1_y - e2_y, 2));
e1_x = (eye_pts[0].x + eye_pts[3].x) / 2;
e1_y = (eye_pts[0].y + eye_pts[3].y) / 2;
e2_x = (eye_pts[2].x + eye_pts[1].x) / 2;
e2_y = (eye_pts[2].y + eye_pts[1].y) / 2;
float dist_h = std::sqrt(std::pow(e1_x - e2_x, 2) + std::pow(e1_y - e2_y, 2));
float rate = dist_w / dist_h;
std::cout<< rate << std::endl;
if (rate < 0.35) {
cv::putText(curr_frame, "sleepy", cv::Point(box.x, box.y), cv::FONT_HERSHEY_SIMPLEX, 1.0, cv::Scalar(0, 0, 255), 2, 8);
// cv::imwrite("D:/sleepy.png", curr_frame);
}
else {
cv::putText(curr_frame, "Norm", cv::Point(box.x, box.y), cv::FONT_HERSHEY_SIMPLEX, 1.0, cv::Scalar(0, 0, 255), 2, 8);
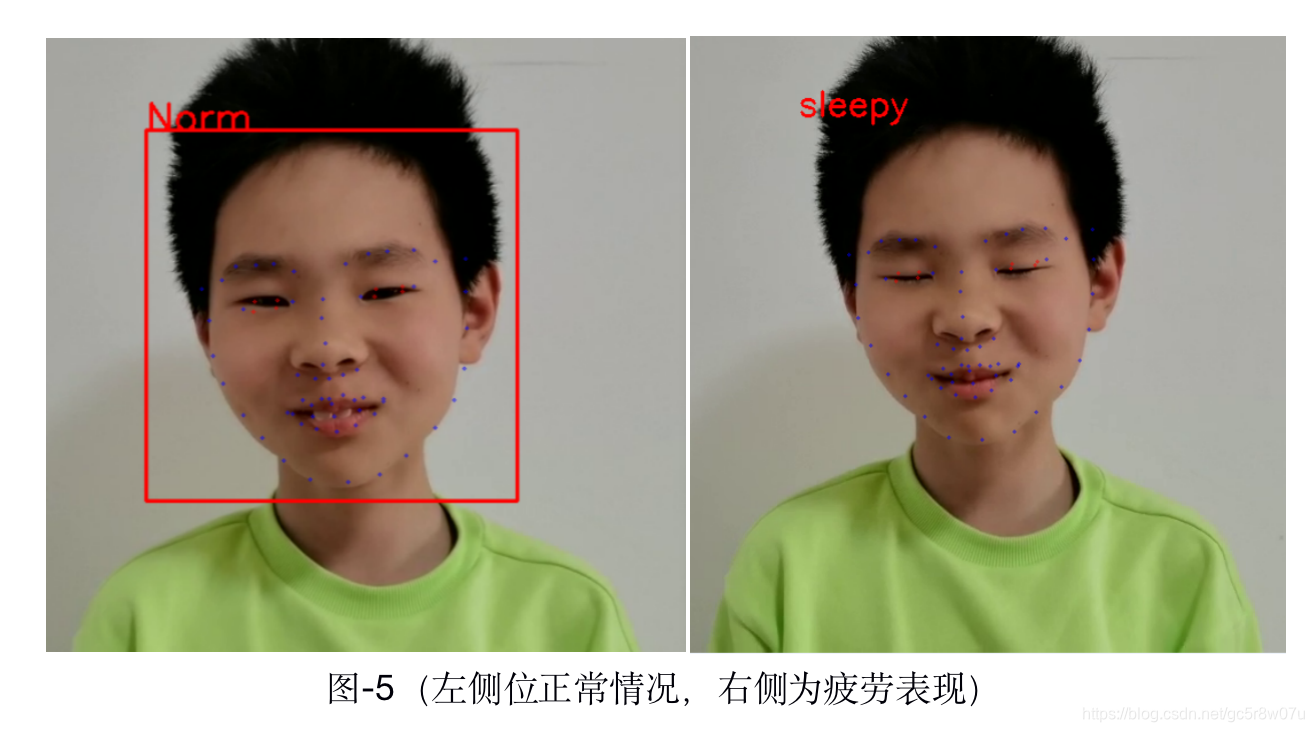
}针对一段视频流的运行检测结果如下:
本文参考的网络素材链接:
https://ibug.doc.ic.ac.uk/media/uploads/documents/sagonas_iccv_2013_300_w.pdf
https://github.com/github-luffy/PFLD_68points_Pytorch